
Viewer and Portal Set-up
10 min
In Essential you can set up as many portals as required, for example if you want a different set of views for your Solution Architects and your Senior Management Team you can create a portal for each with different views in. You can also choose to hide certain views so thet won’t appear in any portals until they are re-enabled.
This can be done in two ways, either in the Essential Data Manager, or in the Viewer using the Viewer Configurator
Using the Essential Configurator
The Essential Configurator can be accessed via the Support Section of the View Library.
It has three tabs that allow you to:
- Set Reports – Use this to set up the configuration for key reports
- Root Capability – the starting point for the Business Reference Model
- Capability Levels – To set the levels for Business and Application Capabilities, required for the Reference Models
- Organisation Root – the starting point for the Organisations Structure
- Roles – define the Roles that are relevant for classes, this defines the roles that will appear in the editors
- Service Qualities – define the classes that service qualities will apply to
- Set Enumeration Styles – Set the text and background colours that will appear in the views for each enumeration
- Set Portals – Amend, Add, Enable and Disable Portals and define the Reports, Catalogues and Editors that appear in each Portal
- Move Portals between Viewers – Use the Export and Import Portal buttons to move portals between Viewers
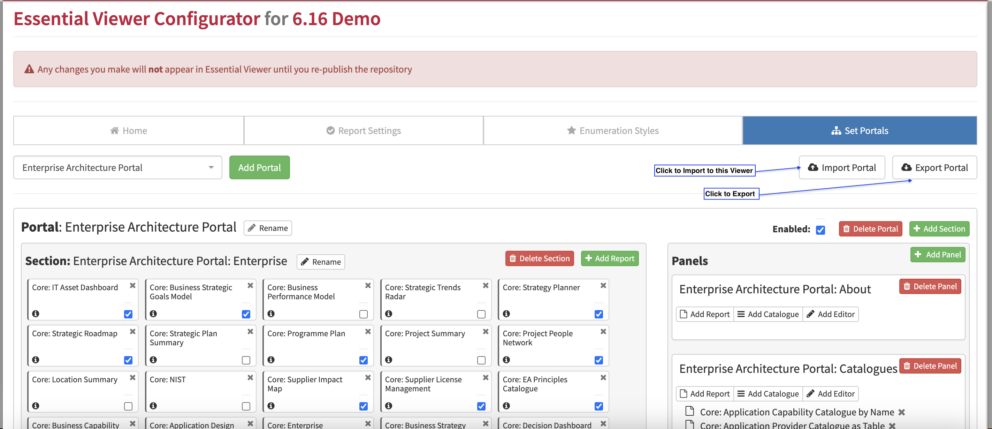
Export and Import Portals
There is help in the Viewer Configurator and the video below provides a walk through.
Set up your required portals in Capture/EA Support/Essential Viewer/Portal Configuration/Portal:
- Add a new portal
- Use the Portal Panels slot you to set the right-hand panels, such as catalogues and editors, and add reports
- Use the Portal Sections slot to add the new sections
- Within each Section, add Portal Section Reports. You will see a new REPORT_TO_PORTAL_SECTION instance where you can select the report to put in the section and use the index to set the order for the report (1 is first in the panel)
- Ensure the Portal is Enabled checkbox is selected
The video below shows a walkthrough for adding Portals in EDM.
Setting Colours for Elements in EDM
Any element can have a style associated with it and, in most cases, views will use that. We typically use these for Enumerations. To set these you go to the instance you want to style, e.g. a Vendor Lifecycle Status of End of Life.
- In the Element Styling Classes slot add an instance (if one isn’t there otherwise click edit)
- In the Element Style Colour slot add a hex colour, e.g. #d3d3d3, this will be the background colour
- In the Element Style Text Colour slot add a hex colour, typically a contrast to the background colour
Once published the colours will be applied.
Turning Reports On or Off in EDM
A number of reports are switched on in Essential by default. To adjust this you can go to EA Support > Essential Viewer > Reports and select the report you want to show or hide. Look for the Enabled on Homepage? check the box and either select it or deselect it.
See the video below for a walkthrough
Un-hiding Classes/Slots
We hide new classes by default when upgrading as some clients have configured their class trees. This means you may need to un-hide a class or a slot. The approach differs between Cloud/Docker and Open Source
Cloud/Docker
If you can’t find a class in the class tree or slot on a form then it is likely to be hidden.
To un-hide a class: Click Configure > Class Editor then in the class tree all classes will be shown. Find the class you want to un-hide in the class tree – you may need to check the release note to find out where it is in the tree
Select that class and it will become the focus in the main pane. Now click Layout and at the top, under Class Visibility, you will see Show Class In Instance Browser, check that and click back on Capture and the class will now be visible
To un-hide a slot: Make sure you are on the class you want to un-hide a slot for and click Configure > Class Editor then click Layout. Find the slot you want to un-hide in the Slot Layout list
Against that slot, you will see a value in the Slot Widget column and it should say ‘Hide’, change that to be whatever that slot is, e.g. an Instance list, and it will now be visible
If you want to Hide slots and classes then do the reverse
Open Source
We don’t hide classes in Open Source but we do hide slots
To un-hide a slot: In Project > Configure > Tab Widgets look for the FormsTab widget and check that. You will have a new tab. Make sure you are on the class you want to un-hide a slot for and click the Forms tab. Now in the class tree look for the magnifying glass with 2 lines next to it, click that. That will open a ‘Configure Form for [CLASS]’ window. In the Widgets Tab Find the slot you want to un-hide in the Slot list
Against that slot, you will see a value in the Widget column and it should say ”, change that to be whatever that slot is, e.g. an Instance list, and it will now be visible
If you want to Hide slots then just do the reverse
Updated 25 January 2024