
Creating New Reports
31 min
Reporting
This tutorial introduces what is involved in writing your own enterprise architecture reports for Essential. Essential Viewer provides a framework for rapidly building new reports using XSL to deliver HTML-based perspectives on your Essential repository.
Once you understand the patterns we use in developing a view, a report should typically take from an hour or so for a simple view, e.g. Application Catalogue or Summary, to a few days for a more complex one, e.g. one of the map-based views, or several days for a very complex one, e.g. the strategic product planner.
Pre-requisite skills
The Essential Viewer framework is based on XSLT. To build views, you will benefit from some high-level knowledge of HTML, XML, and XSL when authoring new analysis reports, but expert knowledge of these is not required for most requirements.
Understanding the meta-model, which you will navigate when creating your views, is important.
The bundled reports provide good examples as to how the reports are authored and the simple schema for the reports’ source XML data means that a small set of XSL and XPath statements are used repeatedly – it is understanding these patterns that is key, and once understood, a view is quite quick to create.
You can create your XSL to generate simple HTML pages for most views or, for more interactive views, you can write XSL to generate JSON structures that you can leverage with Javascript. The latter requires a little more development knowledge.
Getting started
The first step is to plan your report and understand the requirements that you have for it. What areas of the model do you need to analyse? How would you like to present this information?
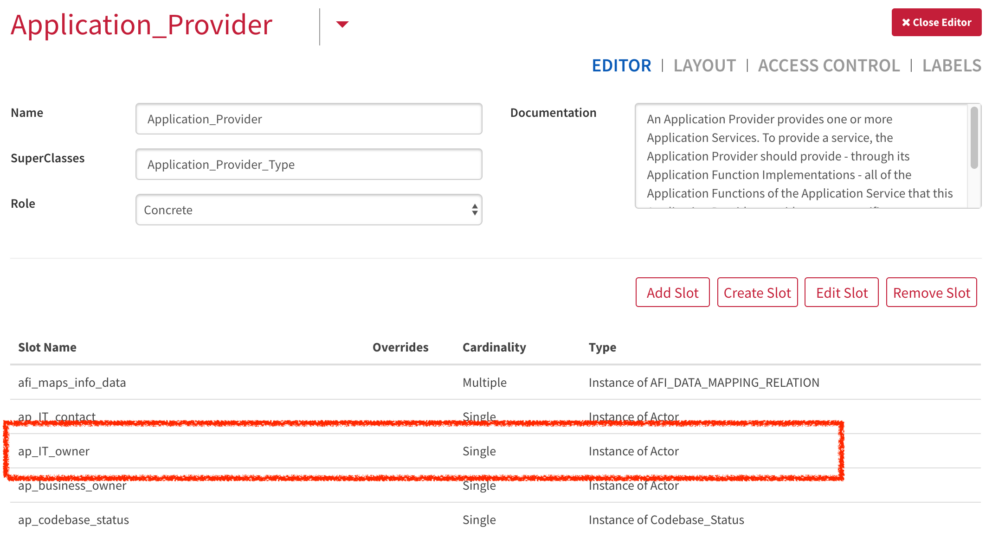
Having decided on what your report will do, you need to establish which Essential Meta Model classes and relationships you need for your report. Draw out the classes you need and the slots that relate to them. As an example, if we want to relate an owner to an application we need (Composite_)Application_Provider and Actor. The slot that relates them is ap_IT_owner
To see which slots relate between classes, either check the to see if it is documented, or look in the repository:
Essential Cloud – Configure > Class Editor
Essential OS – Classes Tab (you will need to switch the tab on)

Or, in the Viewer select Utilities in the top tab and look at the Class Overview. Select a class and you can see the slots (and inverse slots) and target classes for each slot for that class
The highlighted lines show the name of the slot which we will use in our report and the target class
Explore similar reports
Once you understand what the report needs to look like and which Essential Meta Model classes and relationships you need to use, you are ready to start putting the report code together. At this stage have a look at how similar reports that are already in Essential Viewer have been built. This helps not only with the HTML coding but also to show some of the more tricky XSL queries that you might need.
You can access the views on here on our GitHub page
Report page concepts
Each HTML page that is produced, consists of the following components:
- header – the header at the top of the page which includes the logo
- body – the contents of the report
- footer – the footer that is included on each page.
You only need to focus on putting together the body of your analysis report.
We provide a basic_page_template.xsl that includes the all elements for you to use as your starting point, look in the view_templates folder on GitHub.
The Key Tags
There are only a few XML tags that you need to be familiar with to develop any report. The tags that you will be using are:
- knowledge_base – the root node of the repository snapshot. This is normally only used by the top-level template of your report to start analysing all of the instances in the repository
- simple_instance – each instance of the classes in the Essential Meta Model is stored as a simple_instance tag, including relationships. The set of simple_instance tags is the set of all the instances in the repository. Every simple_instance has the following elements:
- name – the ‘internal’ Essential instance ID for the simple_instance. These are the repository unique identifiers for each instance and should not be modified by hand
- type – this specifies the name of the class that this is an instance of, e.g. an Application Service instance will have a type = Application_Service
- own_slot_value – The attributes and relationships for each class, that are stored in slots, are captured using the own_slot_value tags. Each simple_instance has one or more own_slot_values but only where there are values stored in the slot. Empty slots on an instance have no own_slot_value tag in the simple_instance. These slot_values work in the same way for every slot on every class and have the following elements
- slot_reference – the name of the slot (attribute on the class) that is being used
- value – the value that this slot has on this simple_instance. In addition, the value has a value_type attribute that specifies the type data that is stored in the slot. However, this value_type is very rarely used as you will normally already know the nature of each slot that you need to use in the report.
The following extract shows an example of a Technology Domain that has been defined in the repository.
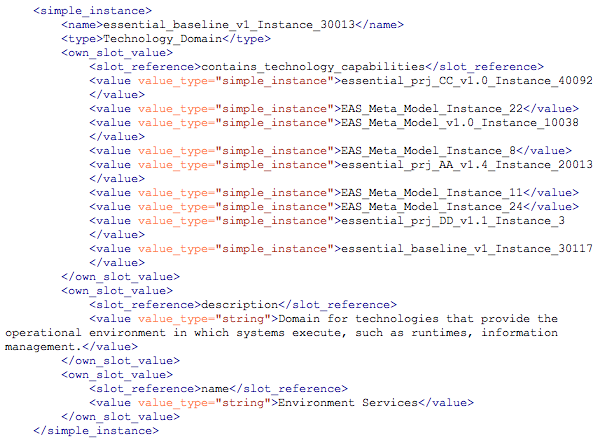
code example
If we dissect the XML we can see that it is an instance(type) of a Technology Domain

instance example
The name of the Domain is Environment Services. Note: the name at the top-level is the ID of the object, to get the actual name it is the name that is against the name slot that you need to use in views

name example
It has a description

description example
It contains a number of Technology Capabilities, we can see by the contains_technology_capabilities that there are a number of Technology Capabilities in this Technology Domain

instance example
That describes our XML structure and what we will be navigating when we write our XSL.
Writing XSL
This is a simple example, we will fetch all Technology Domains and the capabilities against them.
- Copy the basic_page_template.xsl to your user folder and rename it to something meaningful and open the file.
- We are going to add our main code around line 85 of our file, where it says Add Content, however, before we do we will fetch the data we need into memory to maximise performance – this saves us making repeated calls to fetch data
- We do this by putting our data sets into variables at the top of the code. First we will get all our Technology Domains. At line 23 add:
<xsl:variable name="techDomains" select="/node()/simple_instance[type='Technology_Domain']"/>
This is saying – get all simple_instances of type Technology_Domain and assign the node set to the techDomains variable
- We also want to get all our Technology Capabilities that are in a Technology Domain. Note: to filter out any capabilities not in a domain, we can use the domain as an anchor and return only those with capabilities attached to a Domain (again, thinking of performance). Add this line to Line 24:
<xsl:variable name="techCapabilities" select="/node()/simple_instance[type='Technology_Capability'] [own_slot_value[slot_reference='belongs_to_technology_domain']/value=$techDomains/name]"/>
This is getting all simple_instances of type Technology_Capability where the slot value of belongs_to_technology_domain is linked to a Technology Domain in our $techDomains variable ($ is how we call a variable)
This is matching by internal name – regarding belongs_to_technology_domain, look in the repository class editor and you will see this value, which is tied to the Belongs To Technology Domain slot, is linked to Technology Domain.
We could also write this query the opposite way as this relationship is 2-way, ie.
<xsl:variable name="techCapabilities" select="/node()/simple_instance[type='Technology_Capability'][name=$techDomains/own_slot_value[slot_reference='contains_technology_capabilities']/value]"/>
The output is the same as the original query
If you look at the sample XML in the previous section you can see the name of the technology capability is used on the contains_technology_capabilities slot_reference, that is used for matching.
<xsl:value-of select="$[Variable Name]"/> in the Add content section when creating your variables, you can check they are getting populated.- Now we have our data, let’s format it:
- In the Add Content section, we will use a template to iterate through the techDomains variable and create rows of data.
- Add this line:
<xsl:apply-templates select="$techDomains" mode="getDomains"> <xsl:sort select="own_slot_value[slot_reference='name']/value" order="ascending"/> </xsl:apply-templates>
This line will call a template getDomains (we’ll define that next) with each node in the $techDomains variable. We’ll sort the list alphabetically, using an xsl:sort, and based on the name of the Technology Domain
- Now add the template at the bottom of your XSL, before the
</xsl:stylesheet>. Add:
<xsl:template match="node()" mode="getDomains"><xsl:variable name="this" select="current()"/><xsl:value-of select="$this/own_slot_value[slot_reference='name']/value"/><br/></xsl:template>
This is the template that will be called. For readability, you can set the current() (i.e. the current node) to this variable, you don’t have to create a variable and you could just put current() instead of $this in the value-of statement – it’s personal preference.
The xsl:value-of is saying get the value of the name slot of the current node, then put a new line after it.
If you run this code then you will get a list of Technology Domains
- Next, add in the capabilities, add the two new lines to the template
<xsl:template match="node()" mode="getDomains"> <xsl:variable name="this" select="current()"/> <xsl:variable name="thisCapabilities" select="$techCapabilities[own_slot_value[slot_reference='belongs_to_technology_domain']/value=$this/name]"/>** <xsl:value-of select="$this/own_slot_value[slot_reference='name']/value"/><br/> <xsl:value-of select="$thisCapabilities/own_slot_value[slot_reference='name']/value"/><hr/> </xsl:template>
The $thisCapabilities variable is filtering the $techCapabilities variable we defined earlier, but for $this node, notice how the code is almost the same as the original, but we are using our $techCapabilities and $this instead.
The xsl:select is listing the capabilities for this domain, but if you run the code you’ll see it is just a horizontal list on the page at the moment, so not formatted.
- We will now format it into a table. Go back to where we had the Add Content section, wrap an html table around the xsl:apply-templates
<div class="content-section"> <p> <table> <thead> <tr> <th>Domain</th> <th>Capabilities</th> </tr> </thead> <tbody> <xsl:apply-templates select="$techDomains" mode="getDomains"> <xsl:sort select="own_slot_value[slot_reference='name']/value" order="ascending"/> </xsl:apply-templates> </tbody> </table> </p> </div>
- Now in the template, we’ll create a row per node and we will also create a second template to iterate the capabilities. Note you could use an xsl:for-each here, but we’ll keep using the pattern we’ve used previously here, so we’ll just apply a template again.
<xsl:template match="node()" mode="getDomains"> <xsl:variable name="this" select="current()"/> <xsl:variable name="thisCapabilities" select="$techCapabilities[own_slot_value[slot_reference='belongs_to_technology_domain']/value=$this/name]"/> <tr> <td style="vertical-align:top"><xsl:value-of select="$this/own_slot_value[slot_reference='name']/value"/></td> <td><xsl:apply-templates select="$thisCapabilities" mode="getCapabilities"/></td> </tr> </xsl:template>
<xsl:template match="node()" mode="getCapabilities"> <xsl:variable name="this" select="current()"/> <i class="fa fa-caret-right"></i><xsl:text> </xsl:text><xsl:value-of select="$this/own_slot_value[slot_reference='name']/value"/><br/> </xsl:template>
The first template is creating the table row, and we are adding the Technology Domain name to the first column, the second column is calling a template to show the capabilities as a list, with a font-awesome icon in front of each capability.
If you call this from the URL directly when developing, you just change [your domain]/report?XML=reportXML.xml&XSL=user/[name of the file].xsl&cl=en-gb&LABEL=Home and you will see your view
URL Attributes
Essential uses the following set of request parameters in the URL.
- XML – the repository XML document that should be used as the source information about the repository
- XSL – the XSL stylesheet that is to be run to produce the next analysis report page
- PMA – Parameter 1 that can be passed to the XSL stylesheet
- PMA2 – (optional) Used by some reports to control hiding/unhiding of items on the report and available for use as required by reports
- PMA3, PMA4 – (optional) Additional optional parameters available for use by reports as required.
- LABEL – (optional) the name of the report that you are linking TO. You can add the name of the item that the analysis report is about.
PMA is important as you can filter a specific instance based on its ID. PMA carries the ID and it gets assigned to $param1 in the xsl (same for PMA2 – $param2 and PMA3 – $param3)
PMA allows you to filter in the first query so in the above example, we could have filtered by a specific domain (usually done via a catalogue) by adding <xsl:variable name="techDomains" select="/node()/simple_instance[type='Technology_Domain'][name=$param1]"/>
You usually use the PMA variable for instance specific views, i.e where you want to focus on one instance
Testing your reports
You need a decent editor to build your XSL, there are commercial tools and open source tools. Some of our team use the open source Brackets tool, which is fine for view development in Essential
Once the view is ready,
- For Essential Cloud users, upload your view into (usually) Viewer 3
- For Essential Open Source put your view in the user folder
Don’t worry about creating a report yet, to see your view in your URL just change the XSL= parameter to the location of your file
[your domain]/report?XML=reportXML.xml&XSL=user/[name of the file].xsl&cl=en-gb&LABEL=Home
If you have a specific instance then get the ID of an instance. For development, you can do this via:
- Using a catalogue and selecting an instance then looking in the URL at the PMA value. Copy this value into your URL
- In Essential Cloud, select the class you want and select and instance, scroll to the bottom to see the ID to paste into the PMA= value in the URL. See below:

Instance ID
- In Essential OS, select the class you want and select and instance, scroll to the bottom to see the ID to paste into the PMA= value in the URL. Note that in OS you need to configure this. Go to Project > Configure > Options Tab > and check Add :NAME Slot on Instance Forms. You will then see the below on instance pages:
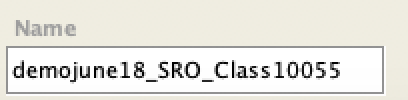
Open Source Instance ID
Then add the value to the URL:
[your domain]/report?XML=reportXML.xml&XSL=user/[name of the file].xsl&cl=en-gb&LABEL=Home&PMA=[the ID you copied]
Useful Development Tools in Essential
We provide a couple of useful views you can use in development, look at the Utilities Tab on the top bar:
The Class Overview tells you slots, target classes and inverse slots for a class
For debugging, and to see slots used by a specific instance the Instance Overview allows you to type the ID of an object in to see what is connected to it by slot.
All Instances by Class allows you to see a list of the ID, name and description for all instances in a specific class.
Deploying your new analysis report
When you’ve completed the testing of your new report and are ready to deploy it, add a report as explained in
More Complex Views
This tutorial gives you a foundation for creating views, however you can create much more interactive reports using Javascript, D3, JointJS, etc. There are also a number of additional features not covered here, but look at some of the more complex views to get an idea how to code using these.
Additional Support
We do run more detailed training sessions on view development or can develop views on demand, for additional support in the development of custom analysis reports, professional services from the Essential Project Team are available. Please use the Contact Us form for more information.
Updated 22 January 2024