Proposal Editor (Cloud/Docker)
19 min
Proposal Editor Overview
The proposal editor allows you to create and manage proposals, so we may have defined a set of ideas for our architecture that we want to propose to take forward as part of our planning. The proposal editor manages this process and helps in the prioritisation process. A proposal moves from being just that to becoming a strategic plan as it moves through the process. You can define when you want a proposal to be set up as a strategic plan in Essential.
The out of the box configured proposal editor has a simple set of tabs, but you can extend the editor yourself in the Editor Builder to add the other tabs depending on your maturity.
Important: You must have created some Business Models before you can use this Editor, use the Business Model Portfolio Manager Editor to do this
Note: you should break the editors apart depending on roles, for example, your decision tab should only be accessible to authorising roles, so you may have a general editor for other users without the decision tab and an editor for authorisers.
Please read the configuration requirements before starting
There are multiple tabs available:
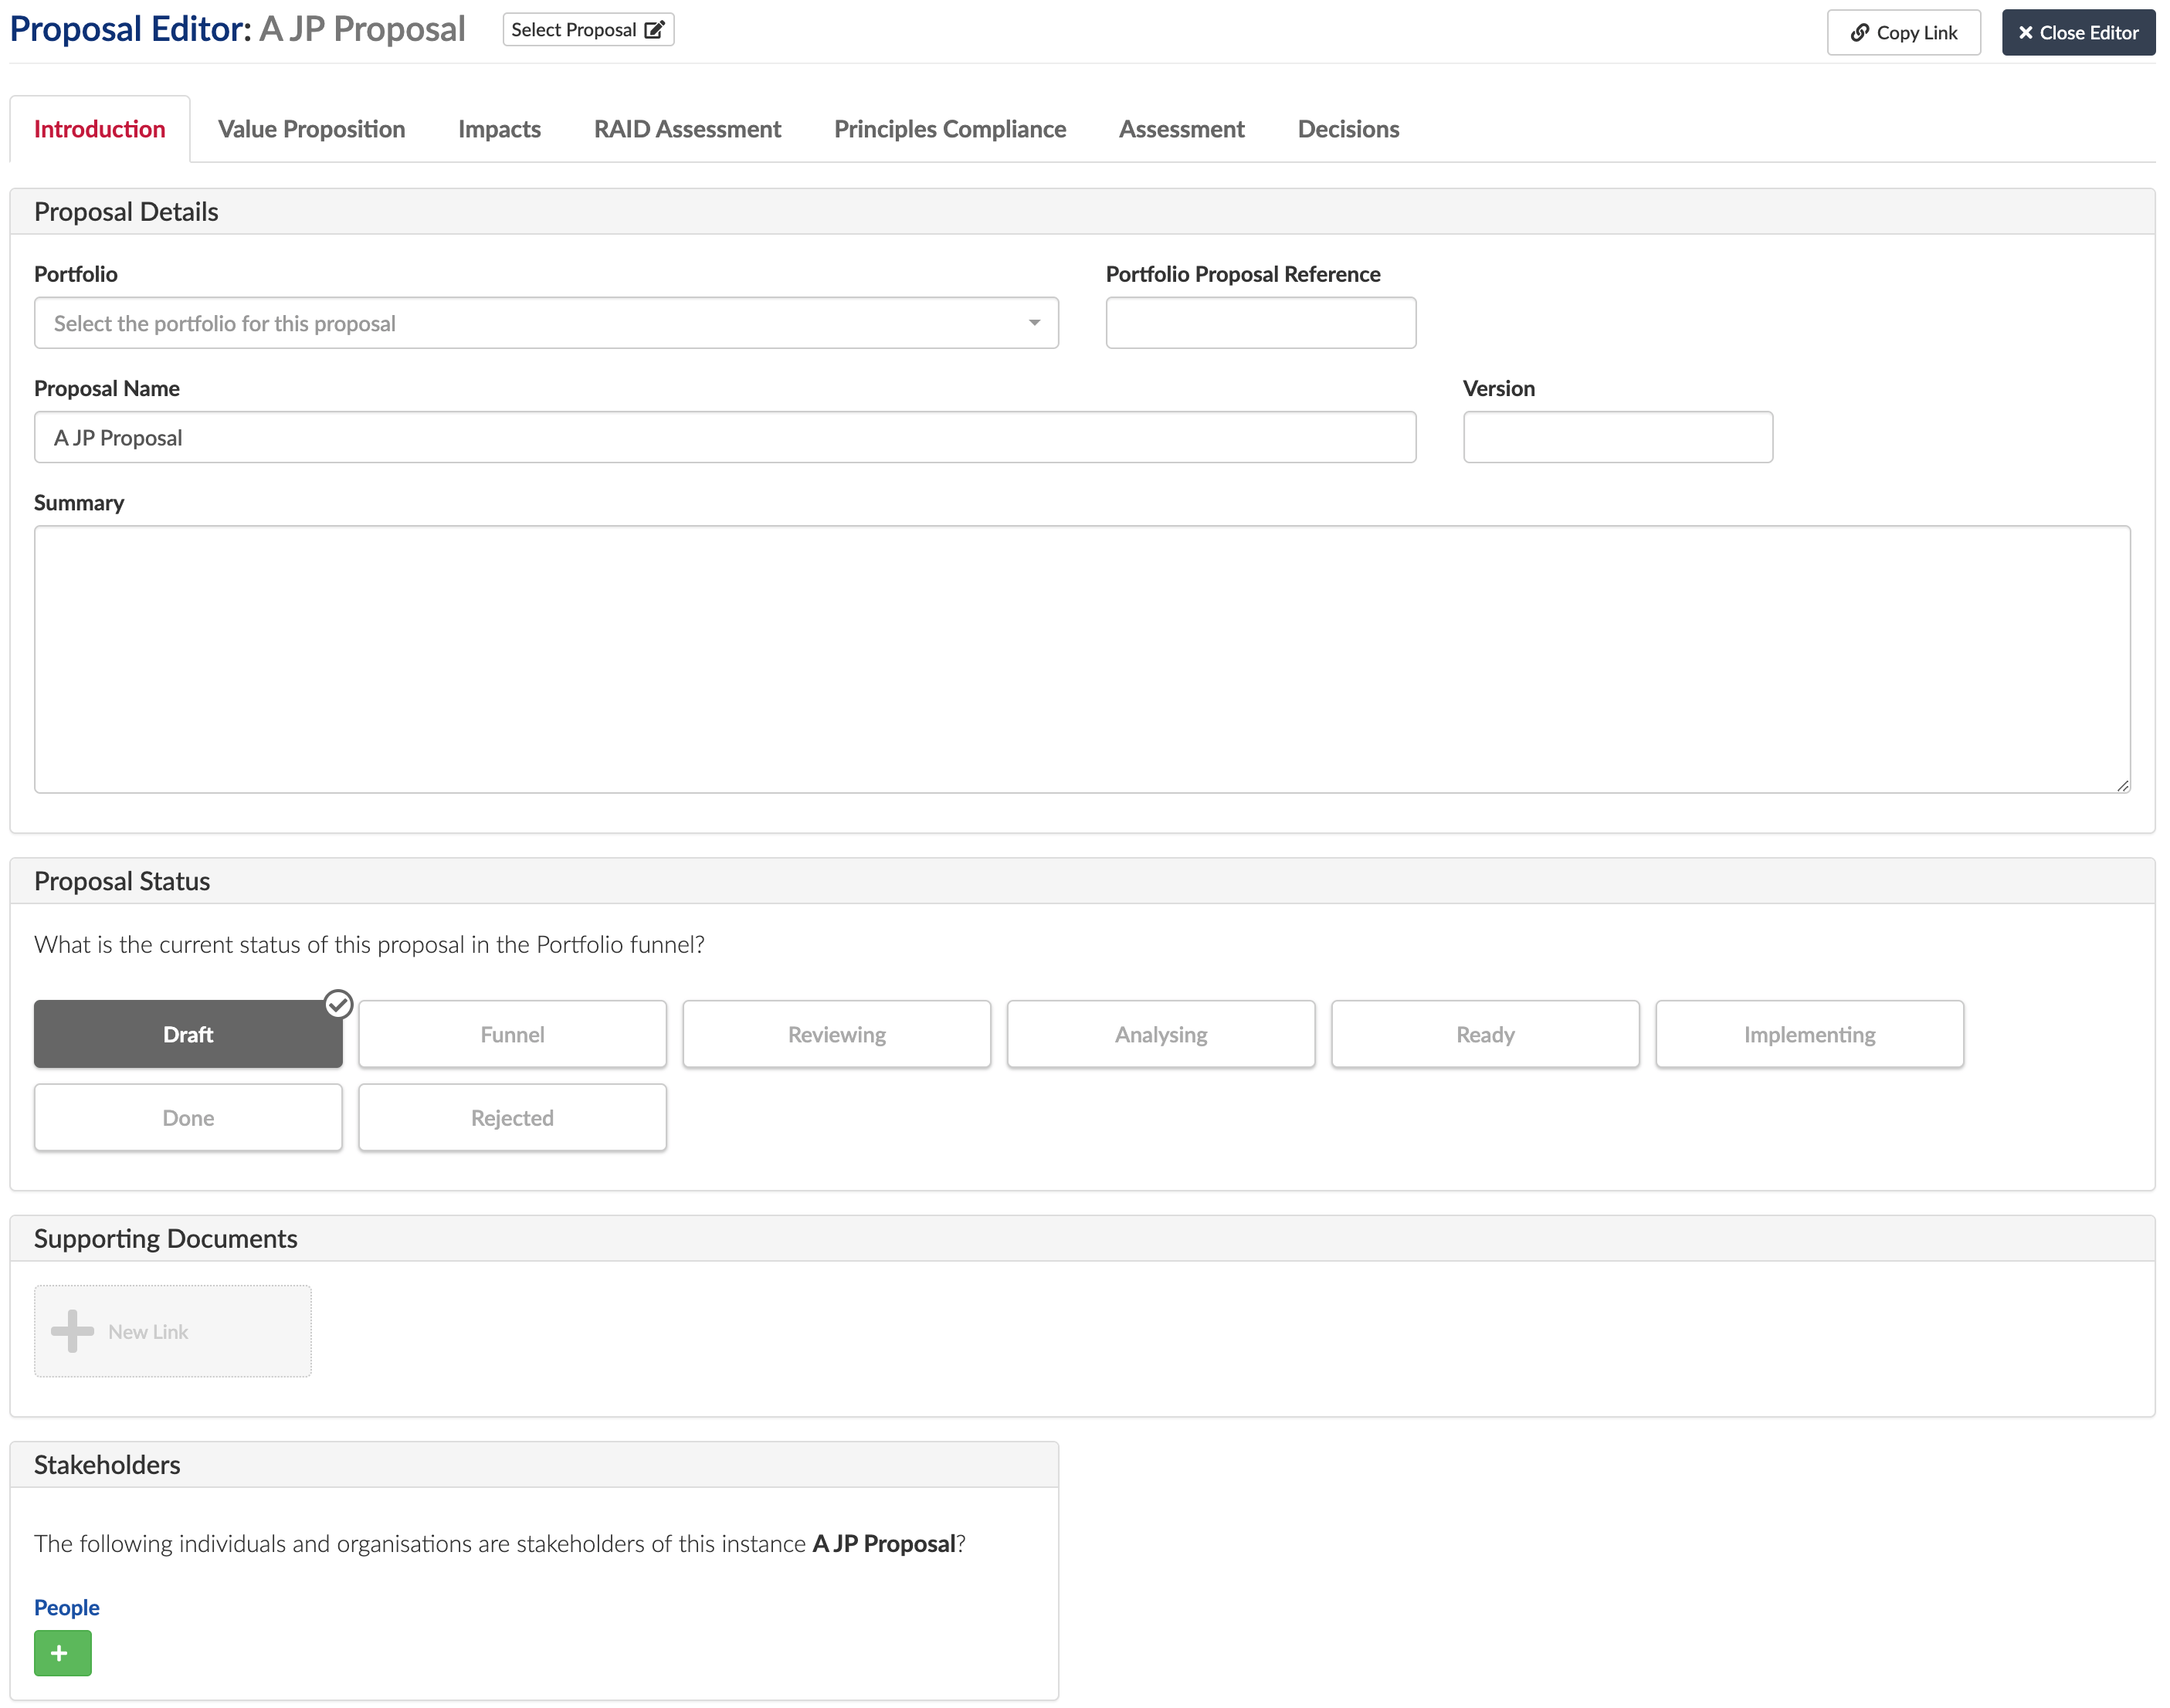
The Introduction Tab
This summarises the proposal, sets a status, assign stakeholders, etc and allows you to add documentation in support of the proposal. All proposals are assigned to a Portfolio, so ensure that you have defined these before you allow people to create proposals.
Note: A portfolio is a Business Model, which is all about defining how the business want to operate. You will usually have multiple portfolios, perhaps by business unit, but having only one is also fine.
As you will see you can create a name, description, version and have a user defined reference for the proposal if required. Status is based on your own values lifecycles, we are use SAFE in out examples but you can remove those and add your own values.
Value Proposition tab
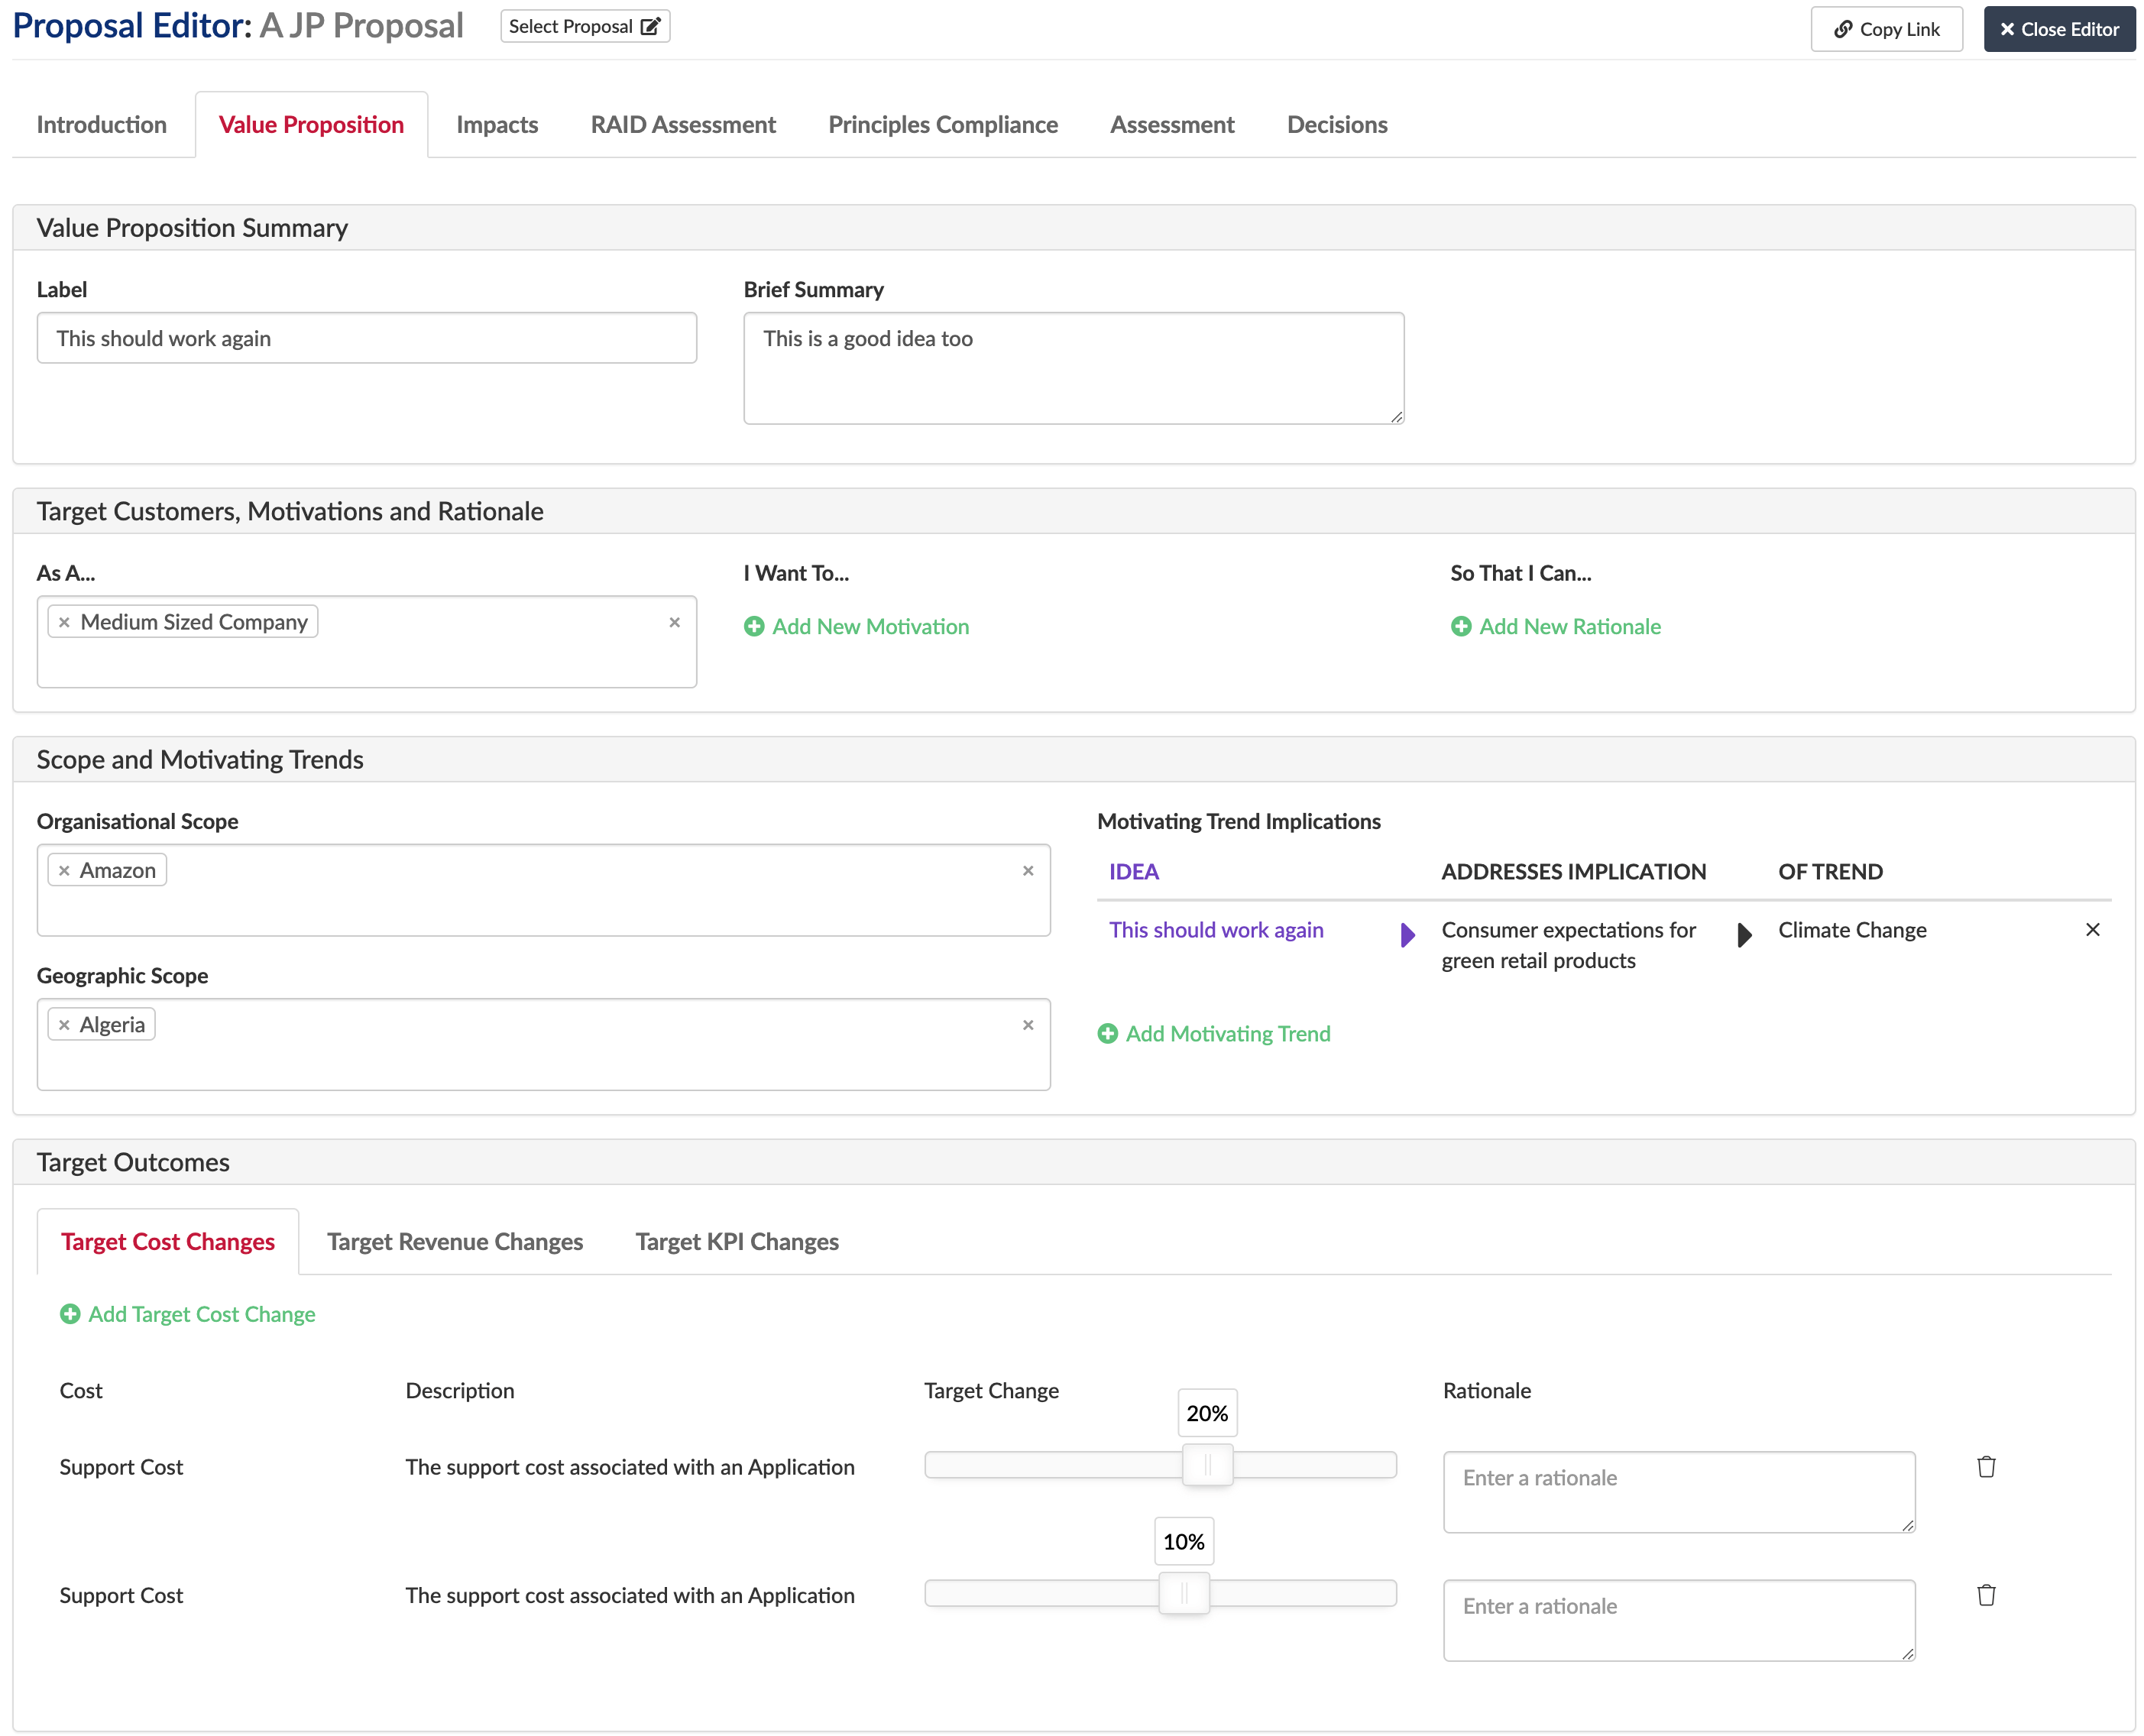
This tab allows you to specify the rationale and scope for your proposal. You are defining who you are targeting and why and what you expect the outcome to be.
Trends can be pulled from the Business Scenario Analysis Editor, if you have defined trends in that editor, or you can add more trends directly using the Add Motivating Trends icon
Impacts tabs
The impacts tabs are where you map the impacts of your proposal to the architecture. You map impacts to your reference models, Business, Application, Technology, Information and organisations
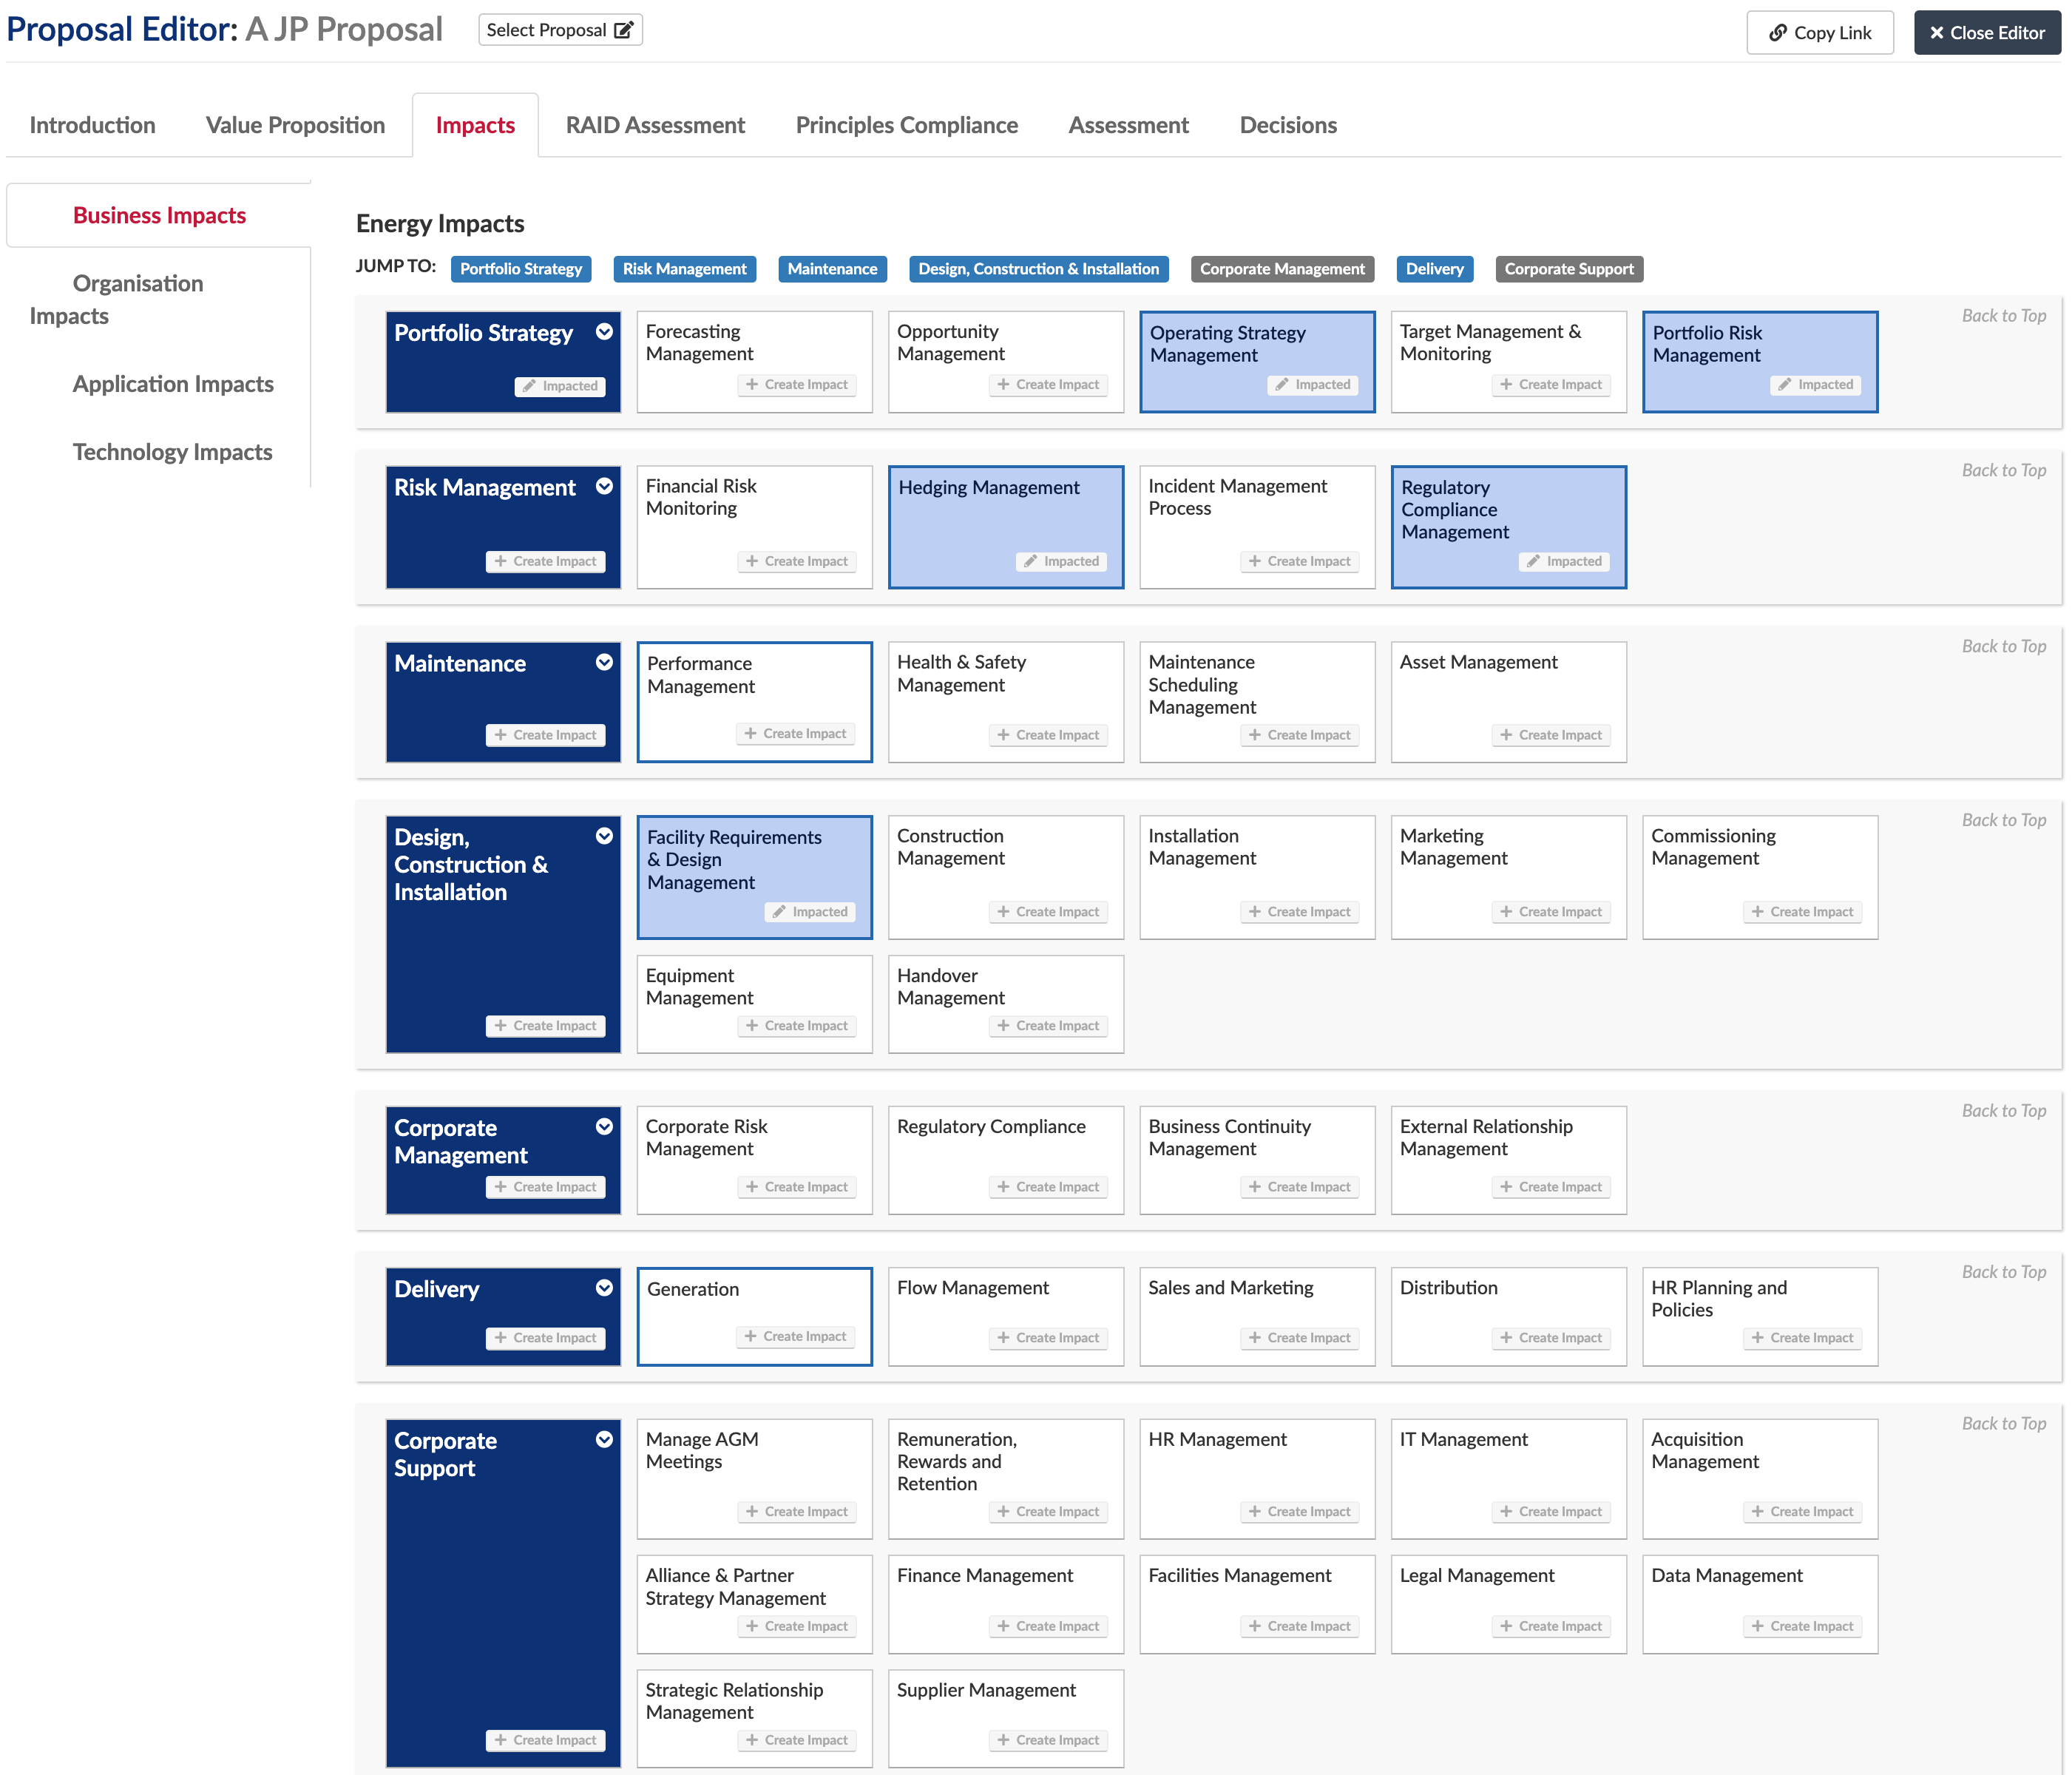
Within these models you select a box and click ‘Create Impact’ or edit a current impact. That will open a panel where you can add information on the impact. In this panel you can add more information on the impact of the proposal, impact statements, impact levels, the action you intend to take, etc and again you can add more detail to these panels if you want using the Editor Builder. To clarify, the action will be used when a strategic plan is created for the proposal.
Additionally, the reference models are set to the top levels on opening, however, you can map to lower levels of any model by clicking the down arrow in the left-hand box ![]() , which will appear if there are lower levels to the model.
, which will appear if there are lower levels to the model.
Note: You can switch on whichever reference model you want to map against in the Editor Builder – this is useful if you haven’t mapped a particular reference model yet. See below.
The organisation impacts tab is a little different, it is a matrix where you proposal is the first column, and you map the org and proposal information as a row of data.
RAID tab
This tab is where you can define your Risks, Assumptions, Issues and Dependencies Opportunities, Considerations, etc, again you can configure this to meet your own needs.
Clicking a box opens a panel where you can edit the item, or clicking New Instance creates a new item
On risk, likelihood is how probable the risk is
On opportunities, this allows you to add additional benefits you think you could get with the proposal
Principles Compliance tab
This panel lets you understand nature of the proposal and its and principles alignment.
It generates a compliance assessment based on the impacts defined in the earlier tabs by looking at the principles in each layer that are mapped to the capabilities/info concepts that you have put impacts against, so the principles shown in the tab are related to things impacted.
If a principle is not mapped to anything, then it is assumed to be enterprise wide and apply to everything. If it is mapped specific capabilities then it is assumed to only be in scope of those capabilities
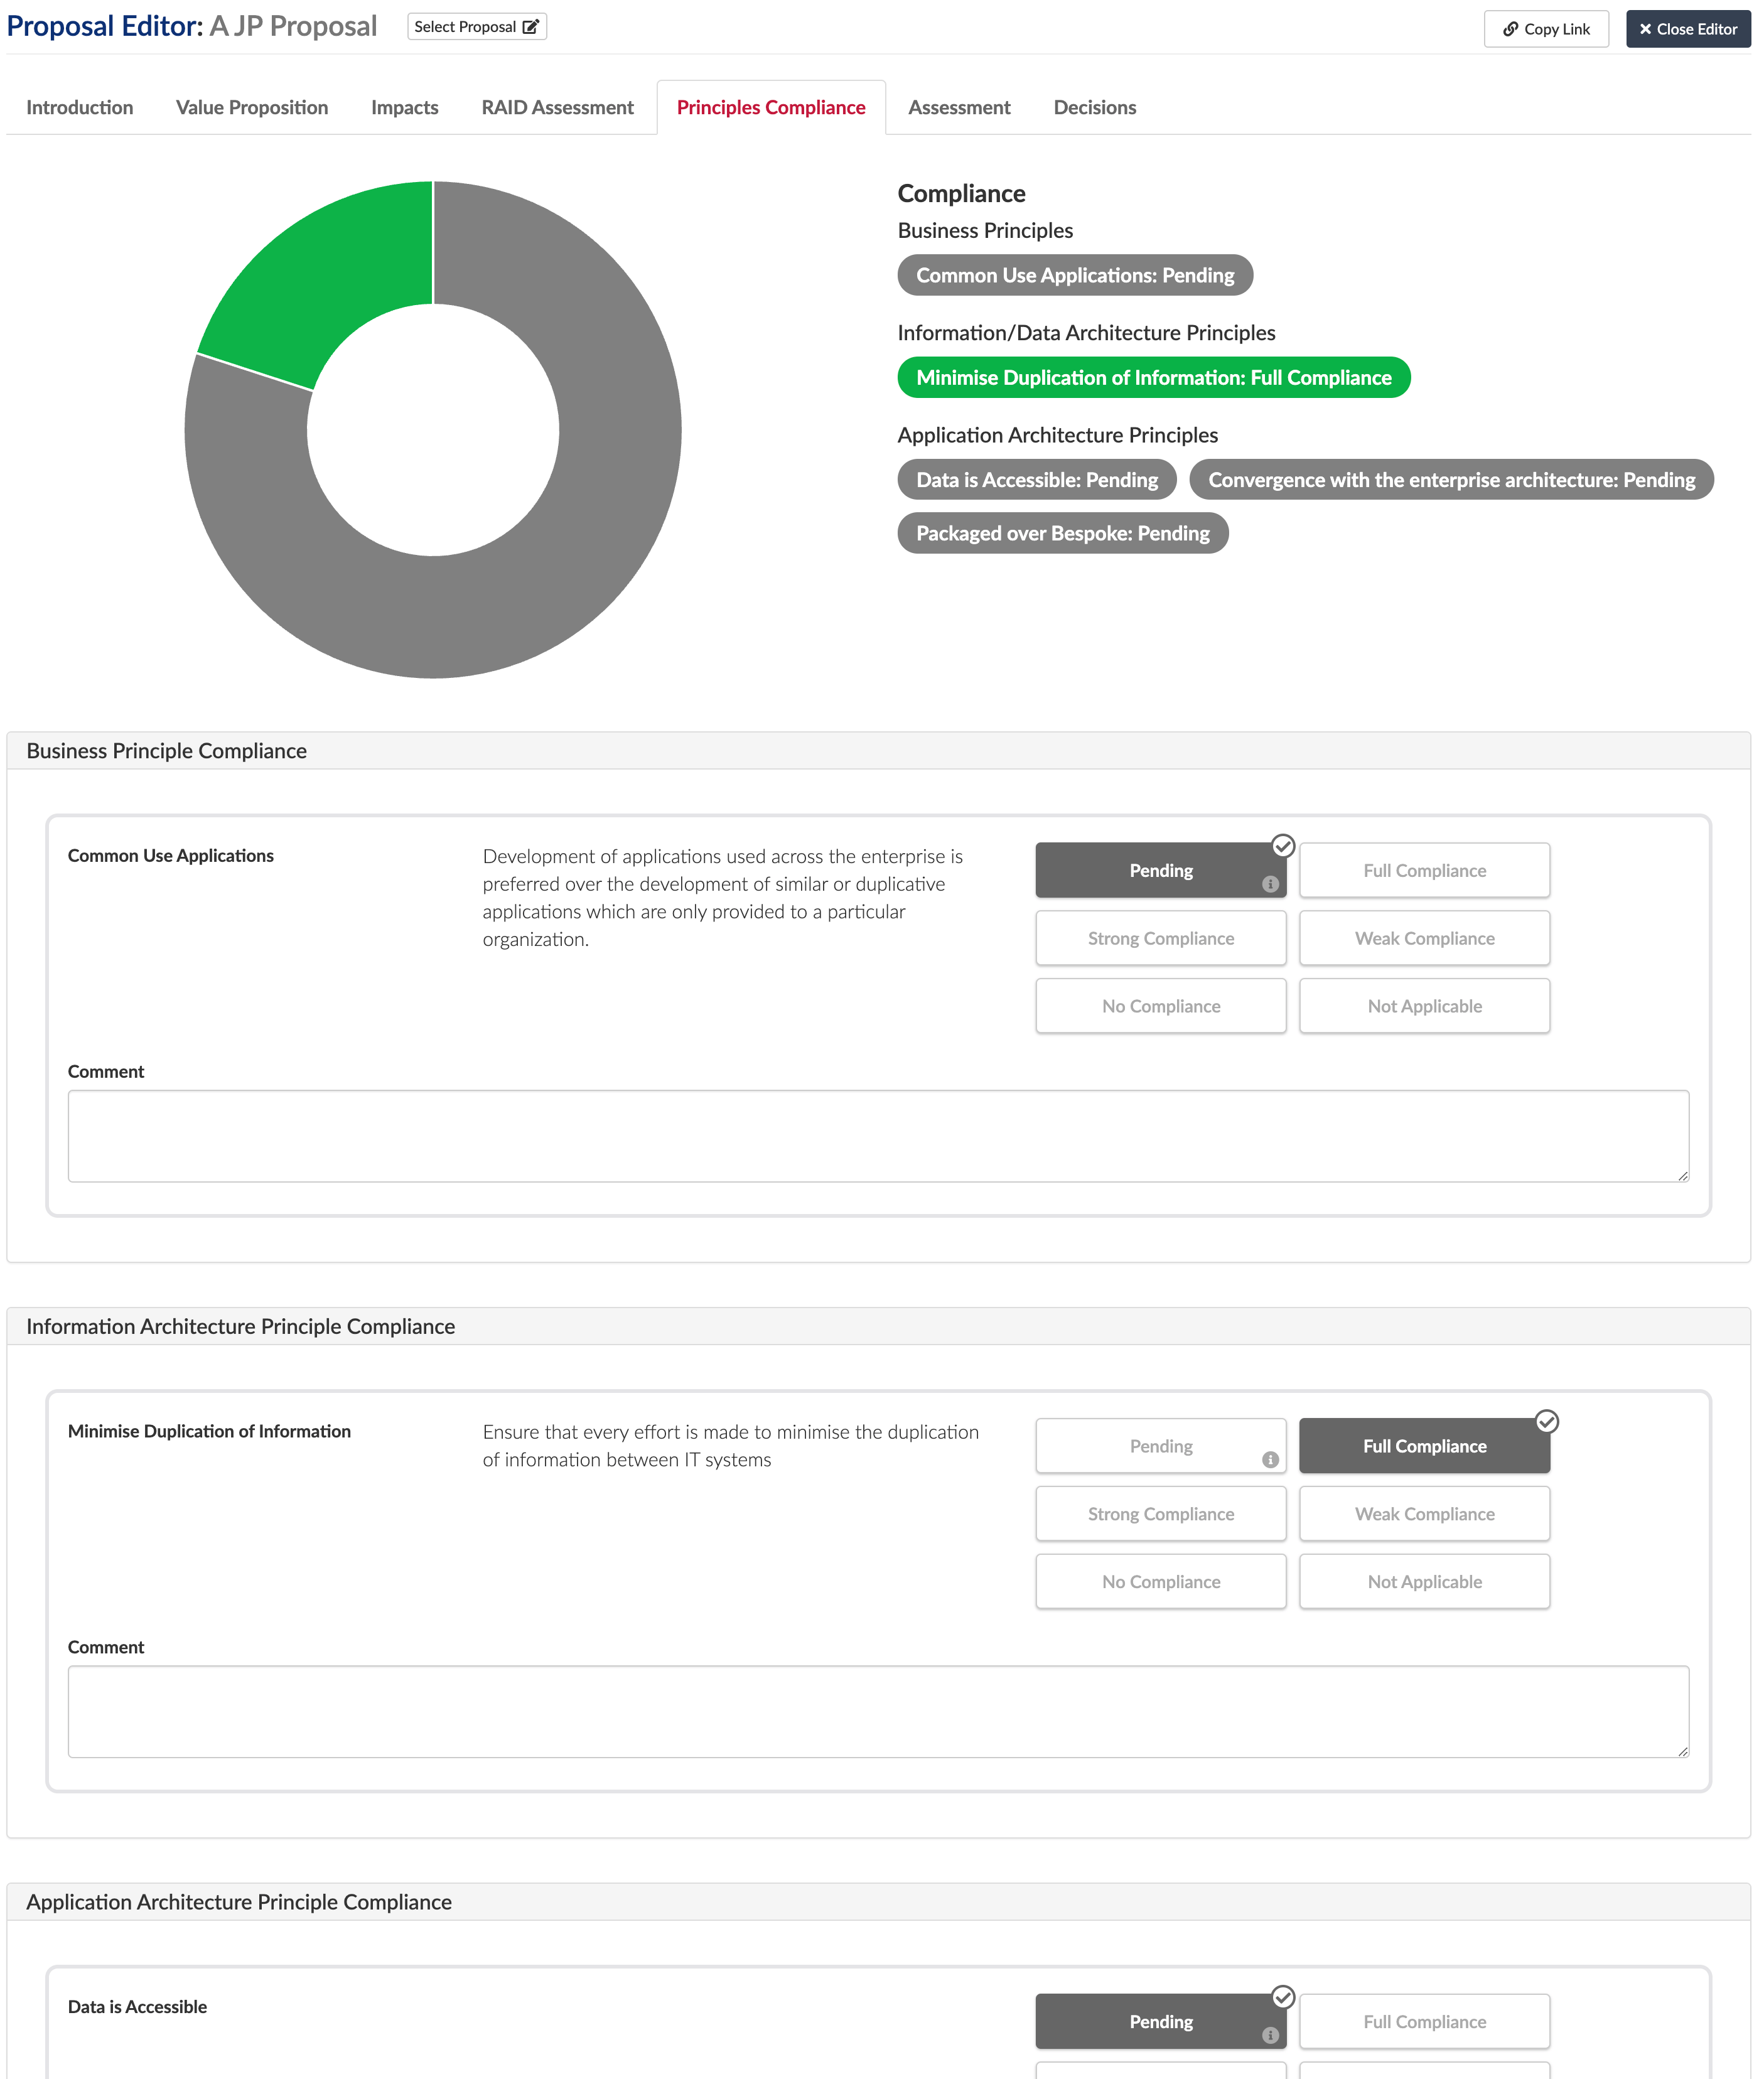
You can define for each principle a compliance level and comment on why you have set the compliance level as you have
A few things to note:
• Once compliance has been assessed then you cannot go back to pending
• You can’t generate principles until you reach a specific stage in the lifecycle, this is governed by how the editor is configured. If you have reached the allowed lifecycle stage then the panel will be editable. The panel will be empty if you are at an earlier stage and open it
• The colours in the chart are driven by the styles applied to the compliance levels in the repository
Assessments Tab
This tab allows you to map the proposal to a set of qualities that you have defined as important to your organisation

Decision tab
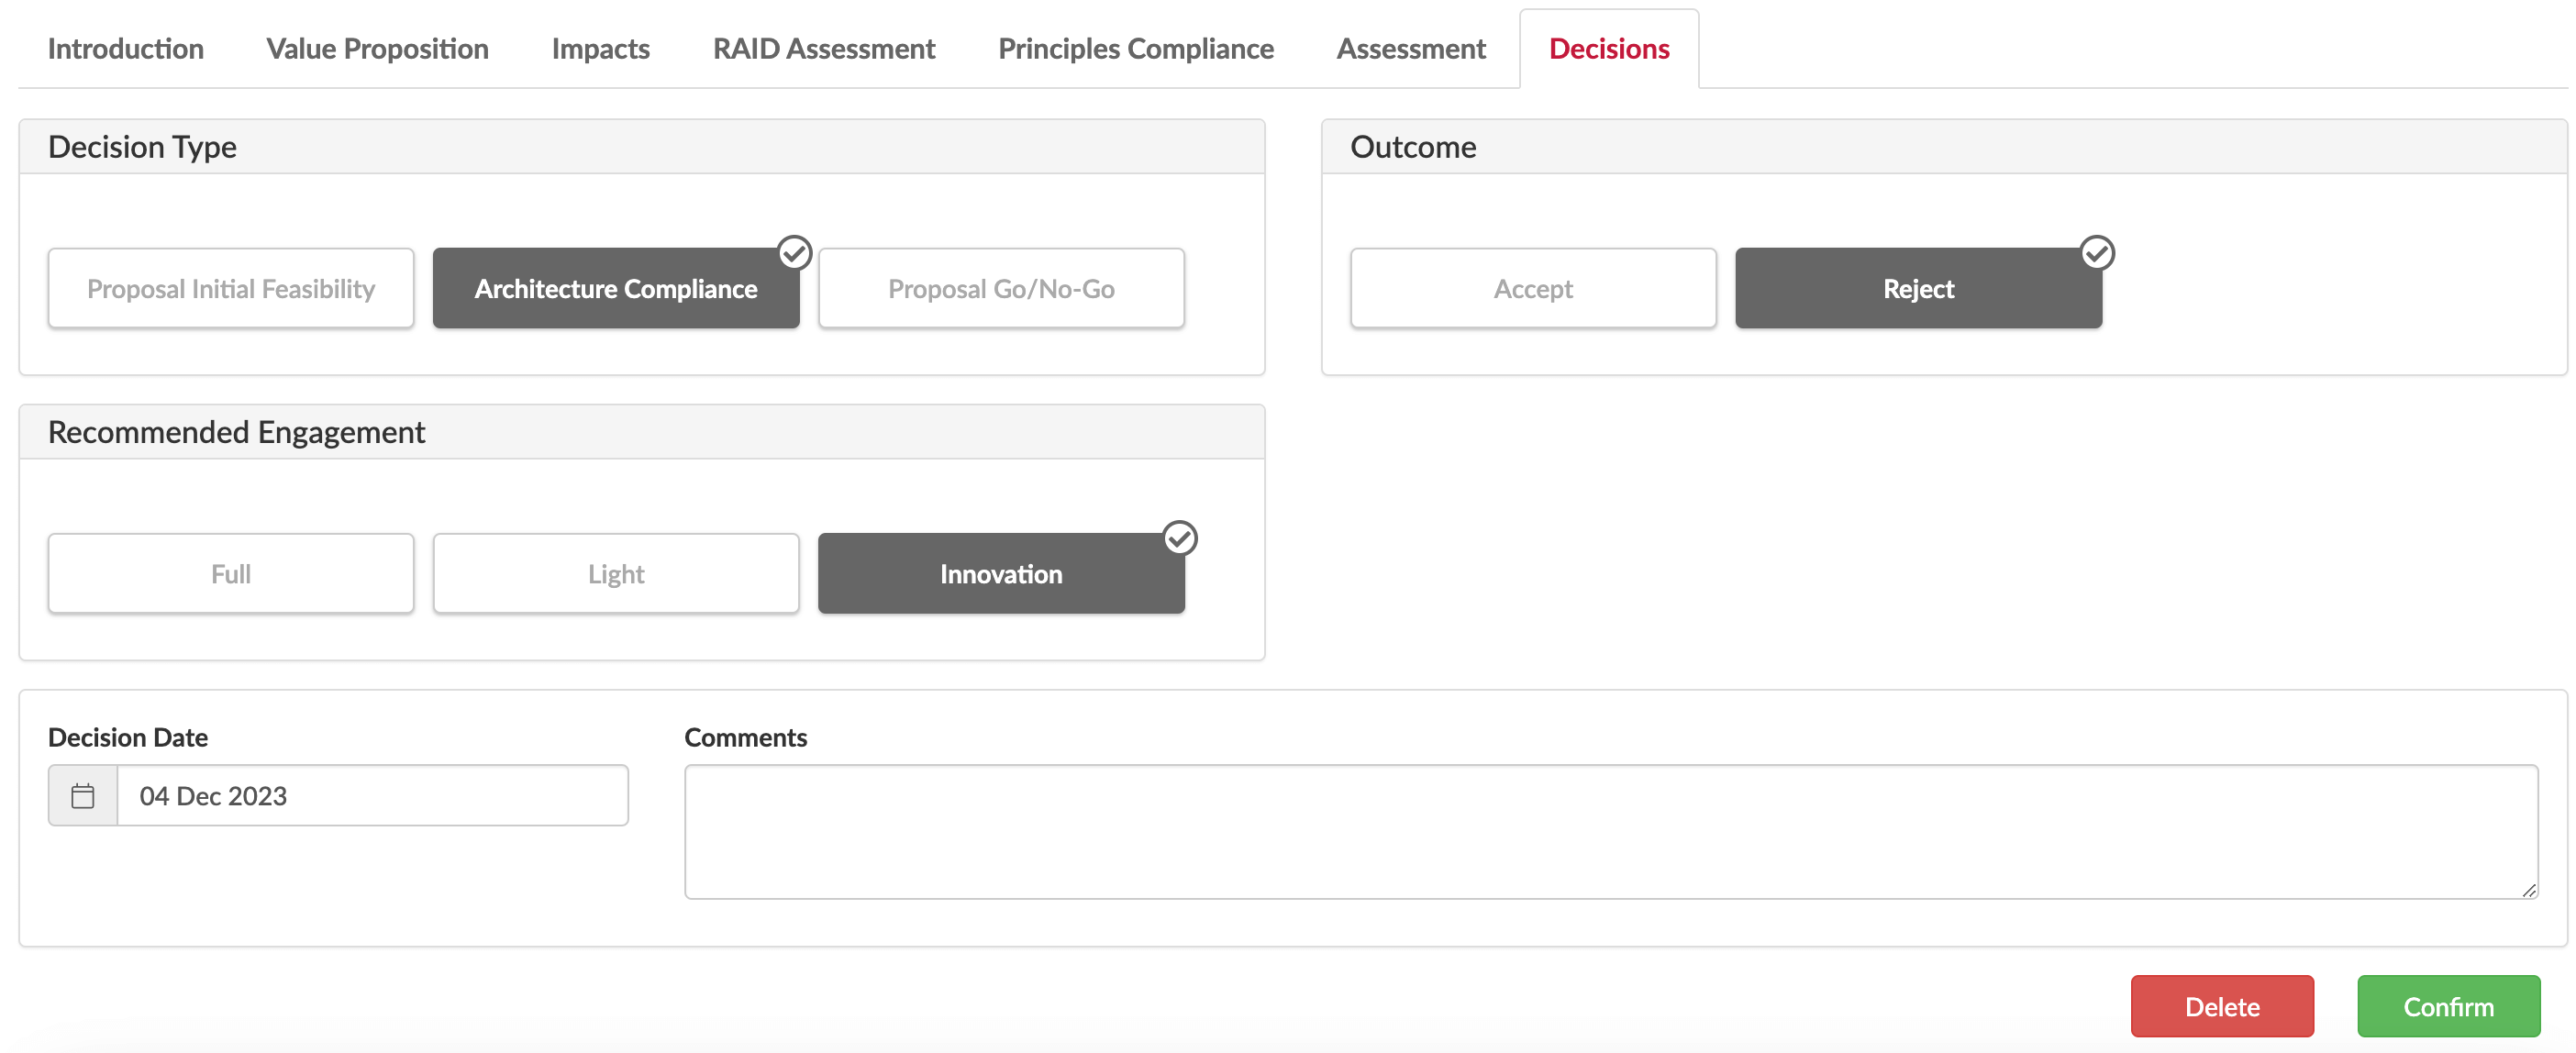
The decision tab is where someone can approve or reject a decision. If an idea has no decision or is not approved then the Add Decision button will appear. By default, on a decision being made then a proposal maybe locked and a strategic plan created, this may depend on your configuration
You can add information such as options, edit date, etc.
If not decided, no decisions, then you will see an Add Decision button
Note: you can configure the tab to: 1) lock after a decision type is met 2) Create a plan/project on completion of a decision type
If there are no impacts with actions then a plan will not be created, as there are no changes to make
Configuration
The proposal editor is fully editable and you may want to add/remove tabs depending on your organisations process or available data, e.g. you may not have an information reference model.
You may want to start purely with just an introduction tab and the value proposition tab and add may add principles and overall assessment later as the organisation matures.
Additionally, in most cases if you want to add additional information to be captured to panels then you can use the Editor Builder to extend the information on the panel – this can include your own slots if you have created those.
You manage all of this via the Editor Builder and the whole proposal editor is based in Idea Option class. Just open and edit the Proposal Editor in the Editor Builder
We are use SAFE in our examples for the lifecycle of the proposal but you can remove those and add your own using the Idea Lifecycle Status class, just find the class in Essential and replace our values with your own ones
Configuration by panel:
Intro tab
You can change labels/fields to meet your names.
Stakeholders – you can configure this to be individuals, e.g. owner, or organisations such as sponsoring organisation
Value Proposition tab
This corresponds to Need class and is fixed so can’t be edited
You need to define customer segments, using the Customer Segment Class
The ‘I want to’ are properties on need, and defines what the user/customer wants from this propositions and justification
Costs are Cost Categories tied to Cost Components (the Need associated with Cost Component Change)
Revenues are Revenue Categories tied to Revenue Components (the Need associated with Revenue Component Change)
Ensure you have set up your Cost and Revenue Types
KPIs – Business Service Qualities associated with proposal. The KPIs dropdown list is defined in the ‘Outcome Categories’ Taxonomy with the KPI names the Taxonomy terms, e.g. Marketing KPIs (give these an index slot for order) and the ‘classifies elements’ slot of the taxonomy term is the Business Service Qualities you want to show in the editor against that KPI. Make sure the Business Service Quality Values associated with the Business Service Quality are set-up. These will be predefined but you can add, edit delete these as you wish
Quick view
- Taxonomy (and Terms) for classifying relevant Business_Service_Quality instances named: Outcome Categories
- Taxonomy (and Terms) for classifying relevant Cost_Component_Type instances named: Cost Category Types
- Taxonomy (and Terms) for classifying relevant Revenue_Component_Type instances named: Revenue Category Types
- One or more instances of Customer_Segment to allow capture of target customers
- One or more Strategic Trend with one or more associated Trend Implication
Impacts
You can decide which impacts tabs to show, it may be just one, some or all depending on your approach, you can have Business Application, Technology, Information, Organisation. In the Editor Builder, under Proposal Impacts tab and in the Impacted Reference Models box, select the models to show
Organisation impacts is a separate panel for now
Quick View
- Business Capability Model
- Organisation hierarchy with root org report constant set
- App Reference Model and App Provider Roles
- Information Reference Model
- Data Subjects and associated Data Objects
- Tech Reference Model and Tech Product Roles
RAID
All of these are customisable:
- Risk ties to the Risk class
- Assumptions to Assumptions class
- Issues to Issues class
- Dependencies is Adhoc_Dependency class
Define a dependency between any 2 elements – check
Principles Compliance
This uses the principles classes in each layer.
You can configure two things.
In Principles tab of the Editor, the Selected Idea Status defines when a user can start to add principles, you cannot generate principles until you reach this stage in a the lifecycle.
The colours in the chart are driven by the styles applied to the compliance levels, these are setting element styling for the Principle Compliance Levels. Do this in the back-end or with the viewer Configurator
Quick View
- Business, Application, Information and Technology Principles
- Map a sub-set of the principles to various Bus Caps, App Caps, Info Concepts/Data Subjects and Tech Caps
- Principle Compliance Level enumeration instances have associated element styles with colour slot set (e.g. RAG colours)
Assessments
Overall assessment is Performance Measures against the Idea Option class and you can create your own values for this. In the Editor Builder, edit the Assessment tab > performance measures panel and under Selected Performance Measure Categories, choose the Performance Measure Category to use. You need to have Service Qualities defined against the Performance Measure Category.
Decisions
This uses the Decision class – different phases go into the decision history. The enumerations used are:
- Decision Type
- Decision Result
- Decision Commitment Level
So, you may want to change the value to match your own terms
Updated 17 January 2024

