
Configuring the Metaproject
13 min
You only need this if you want to have a number of users accessing the repository and make use of collaboration. The access is rudimentary in Open Source, so it’s a case of you can Read/Write, Read or have no access. The Protege server is itself controlled by a Protege project called the ‘metaproject’. This project tells the Protege server about all the projects that it is be hosting, which users are defined and which projects the users can access. Once all the server software components have been defined, the following steps should be run on the physical server in order to define the metaproject.
A default metaproject is installed with Protege and the Protege server is configured to use this out-of-the-box. Using this metaproject make the installation of the server simpler – and for this reason, the Essential Project provides a starter metaproject which can be installed to this default location. However, you may wish to manage your metaproject alongside your Essential Architecture Manager repository in a separate area of the filesystem, in which case do the following:
- Choose your alternative server configuration location when installing the server components from the Essential Installer.
- If you have already installed the server configuration starter to the default Protege location, copy the metaproject.pprj, metaproject.pins and metaproject.pont files from /examples/server/ to the/EssentialAM/Repository directory. (Assuming that your repository is installed in /EssentialAM/Repository)
- Update the run_protege_server.bat (on Windows) or run_protege_server.sh (on Mac OS X, Linux, Unix etc.) file and change the METAPROJECT variable so that it refers to the file you created above.
Meta Project Definition
This section requires you to start working with the Protege software.
The Protege server uses an ontology of projects to manage the repositories that it is hosting and serving. This ontology also defines the users and access control policies for the repositories. This must be configured as follows.
- Start the Protege client.
- When prompted to open a project, open the metaproject that you wish to use:
- the default metaproject is: /examples/server/metaproject.pprj
- or your alternative location, e.g. /EssentialAM/Repository

Open the metaproject
Once the metaproject has loaded, click on the ‘Instances’ Tab to create new instances that define the server configuration.
In the Protege metaproject, you will now:
- Define the Groups [which work like Roles] that will be allowed to access the server. As a minimum, create:
- Architects a group for all architects who can read and update models
- Viewer a group for users who only have read access to the models.
- Define the users by creating a new instance for each user that will be using the Essential Modeller. Although passwords are visible to administrators of the metaproject they are obfuscated when clients use them. Add the Group that this user belongs to [i.e. the roles that this user can play] by selecting the appropriate groups in the Allowed Group field or by adding members to the Group. Make sure to add your own user account to the AdminGroup.
The World group can be left in the ontology.
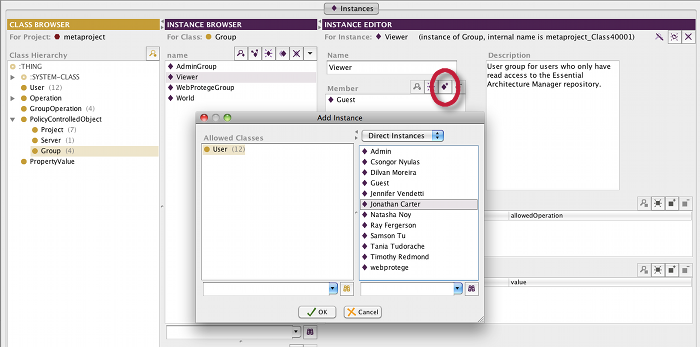
Define Groups for Architect and Viewer and add users
Define GroupOperation instances for each of the Groups that you defined. These Group Operations define what the Group is allowed to do on this Protege server.
Create a new Instance of the GroupOperation for the new Groups that you have just defined, Architect and Viewer.
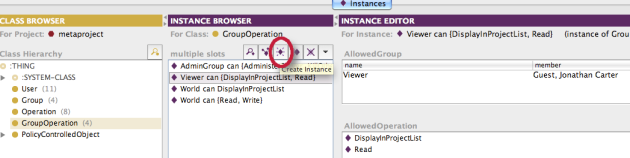
Create a new GroupOperation for each Group
Note: Make sure that you are using Protege 3.4.1 or above for your Protege Server, as there is a known issue with the ‘Write’ permission in Protege 3.4.
Set the access rights for each group by selecting the Operations that this group can perform.
- Allow Read, Write and DisplayInProjectList for the Architects Group
- Allow only Read and DisplayInProjectList for the Viewer Group
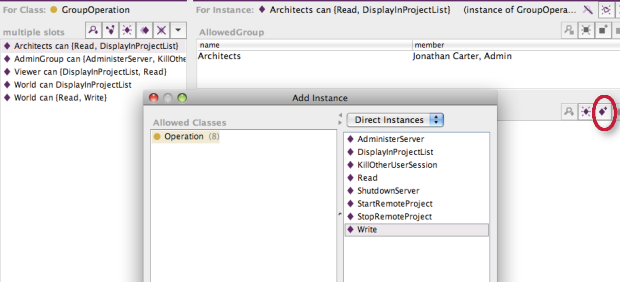
Set the access rights (operations) allowed for each Group
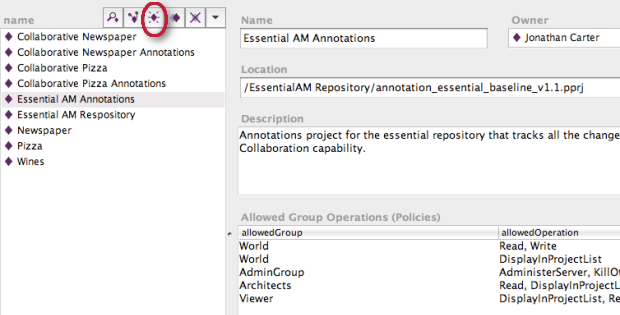
Define the project for the Essential repository.
- Create a new Project instance and give it a suitable name.
- Specify a user as the owner of this – typically this is the user who is also the administrator of the repository.
- Specify the location of the Protege project file that is the root of the repository. This is the full path to one of the files that were deployed in step 7 and will be a .pprj file. Even if your repository is being stored in a database, a .pprj file is required. As this is a Java environment, use the Unix-style directory separators to define the location of the repository’s project file, e.g. on Windows, this would still be:
- Add a short description of your repository
- Add (use the ‘+’ button ) GroupOperation instances in the AllowedGroupOperations table to allow the Architects Read and Write and the Viewer just Read.
C:/EssentialAM/Repository/myRepository.pprj
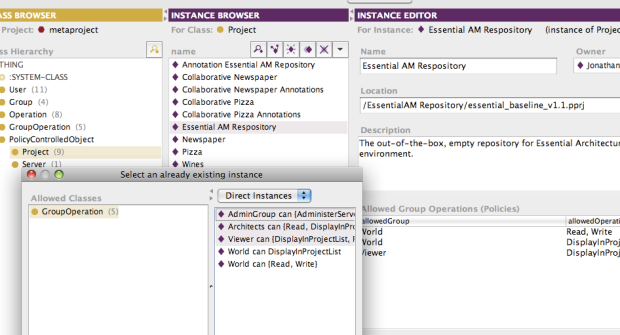
Define the project for the Essential repository
Having defined the Essential Architecture Manager repository project to the Protege Meta Project, we need to add the Annotations Project for Essential Architecture Manager to the Meta Project. The Annotations Project manages collaboration capabilities including tracking all changes to the repository and is created automatically by Protege when you choose to show the collaboration panel. If you have not already enabled the Collaboration in your Essential Architecture Manager repository project, see the Enabling Collaboration article for how to do this.
Using the Annotations Project is optional but recommended for multi-user installations. You can create the Annotations Project after you have completed this Meta Project configuration. Protege Server will raise warnings if it cannot find the specified Annotations Project but you can continue to work with your repository in multi-user mode when Protege cannot find the annotations project.
Create a new Project instance for the ‘Annotations’ Project. This project contains a list of all the changes and collaborative activity that is taking place on the repository. Follow the same steps as those for the Essential Architecture Manager repository project, above, to create the definition of the annotations project, remembering to specify the location of the annotations project file.
- When defining the name of this project, use the name of the Project defined above and add the suffix ‘Annotations’ so that the difference can be easily seen, later on, e.g. ‘My EA Repository Annotations for a repository that has been named ‘My EA Repository’.
- The location of this annotations project should be in the same directory as the repository project (it was installed in Step 7.1), and will normally be named using a prefix of ‘annotation’ on the repository project name, e.g.
C:/EssentialAM/Repository/annotation_myRepository.pprj
- Add the GroupOperations as you did with the repository project. You can hide the annotations project from the set of projects available to open in the server by removing the DisplayInProjectList operation from the World, Architects and Viewer groups.
Define the Annotations project to track changes in the Essential repository
- Go back to the Project instance for the repository project, e.g. ‘My EA Repository’.
- In the field called AnnotationProject at the bottom of the form, select the Annotations project that you defined above, e.g. ‘My EA Repository Annotations’.
- Delete the example projects from the ontology, e.g. ‘Collaborative Newspaper’, ‘Pizza’, ‘Collaborative Pizza’.
- Delete all the example users.
- Save the metaproject, using the Save button on the Protege client.
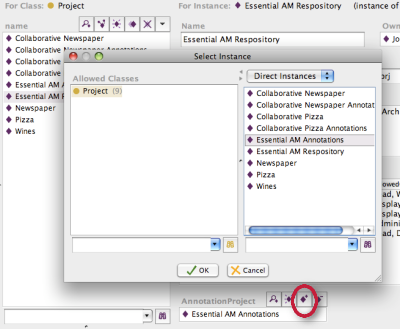
Setting the Annotations Project for the Essential Repository project
Updated 31 October 2023