Multi-User Installation
39 min
This installation guide details the process for installing Essential Open Source in the Multi-User mode.
In Multi-User mode, it is recommended that a database, such as MySQL, is used to manage the storage of the repository. Before proceeding, please ensure that you have access to a suitable database server, including a user name and password with rights to create schemas and tables. First, complete the server installation then proceed with the client installation for each workstation where users will be updating your architecture models.
External Dependencies
Essential Open Source has some external dependencies that are required before setting up Essential
1. Java Runtime Environment
Before starting the installation of Essential Open Source, confirm whether or not a JVM has been installed. From a command prompt, type:
java -versionThe resulting message from Java should show a JVM version at version 1.8.x. If a JVM is already present that meets the required version, there is no need to install the JVM that is provided with Protege.
If you do not already have a Java Runtime Environment installed, please download and install the correct JRE/JVM for your platform.
2. Install Protege
If you have not already installed Protege, install it by running the installation program.
2.1 Microsoft Windows
The following steps should be followed to install Protege on a Microsoft Windows Platform.
- Run the install_protege.exe file.
- Select the option to install “Everything” as this will include the optional tab widgets that may prove useful at a later date, e.g. Prompt, Jambalaya.
- Select the installation folder, preferably take the default in Program FilesProtege_x.x.x
- Select the JVM that Protege should use. If from Step 3, a suitable JVM (version 1.8 or above) has already been installed, select that JVM.
- Select ‘Next’ until the installation completes.
2.2 Other platforms – Mac OS X, Linux, Unix
Run the Protege installer for your platform and follow these steps:
- Select the option to install “Everything” as this will include the optional tab widgets that may prove useful at a later date, e.g. Prompt, Jambalaya.
- Select the installation folder, preferably take the default
- Select the JVM that Protege should use. If from Step 3, a suitable JVM (version 1.7 or above) has already been installed (this will be the case on Mac OS X), select that JVM.
- Select ‘Next’ until the installation completes.
2.3 Configure Protege
Please open Protege now.
- Go to the ‘File’ menu and select ‘Preferences’.
- Un-select the option ‘Sort class tree (Classes Tab)’ to ensure that the Essential Meta Model class hierarchy is shown in the correct order.
- Click OK and exit Protege.
3. JDBC Drivers
Install the required JDBC drivers as per the instructions supplied with them. The Protege server will use these to connect to the database that will hold the repository. To enable Protege to see these drivers:
- Copy the .jar file for your JDBC driver to the Protege install (root) folder as driver.jar
- If driver.jar is already being used, use driver0.jar, driver1.jar or driver2.jar
If you need the option to use more than 3 different types of database server to hold different repositories managed by the same server (i.e. you need more than 3 JDBC drivers):
- Modify the file: /protege.lax to add the path to your JDBC driver JAR file (including the jar file itself) to the lax.class.path property.
4. Apache Tomcat Java Application Server
4.1 Install Apache Tomcat
If you do not already have Tomcat (or an alternative Java Application Server that can run Java Servlets) installed, please install it by running the installation program for your platform.
Like Protege, Tomcat requires Java v1.8 or above. For simplicity, select the same JVM that was selected during the Protege installation. In this case when prompted by the Tomcat installer, select the path to the folder “jre”.
4.2 Run Tomcat as Windows Service
On Microsoft Windows platforms, set Tomcat to run AUTOMATICALLY as a Windows service via the Services panel in Control Panel. For other platforms, please follow the Apache Tomcat instructions for running it as a daemon / background task.
4.4 Setup user accounts
If you wish to control access to the analysis reports of Essential Viewer, set up the required user accounts as follows:
Edit the /conf/tomcat-users.xml file to create user accounts that have the report_viewer role.
After making these changes, restart the Tomcat service.
You can deploy Essential Viewer under a different name, e.g. Essential Viewer Development, to create different environments for publishing your architecture. This can be useful if you want to share a repository that is work-in-progress with your team, while maintaining a ‘published’ repository view that can be viewed by your entire organisation. The Essential Reporting tab allows you to publish to any available instance of the Essential Viewer.
Core Components
Essential Open Source is comprised of four core components which must be installed separately.
Essential Widgets
Essential Widgets is a set of custom-built plug-ins for the Protege Ontology Editor.
1. Run Essential Widgets Installer
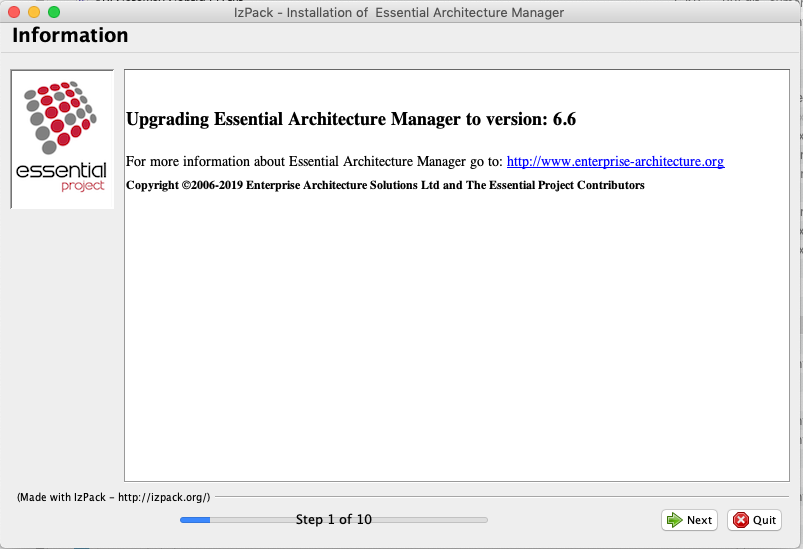
Having installed the pre-requisites, run the Essential Widgets installer, which will guide you through the rest of the installation process. The following sections in this guide provide additional detail about the options for the installer and the questions that it will ask.
To run the installer:
Double click on the Essential Install JAR File.
If, for some reason the installer is not recognised as an executable JAR file, use the following command at command prompt/terminal window:
java -jar essentialinstallxx.jar
(where xx is replaced by the version number as required)
You will now see the welcome panel of the installer and will be guided through the install process.
2. Important Information and License Agreement
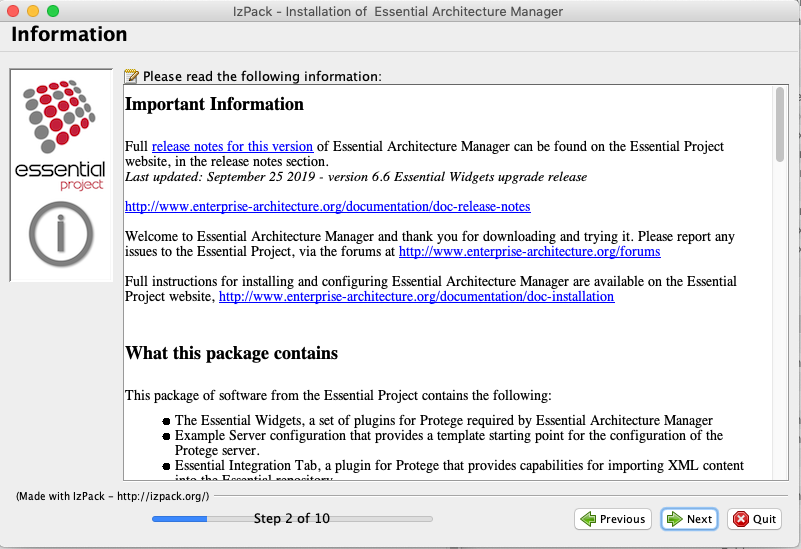
The Information Panel provides important information about the installation and pre-requisites. Please read these before proceeding to the license agreement.
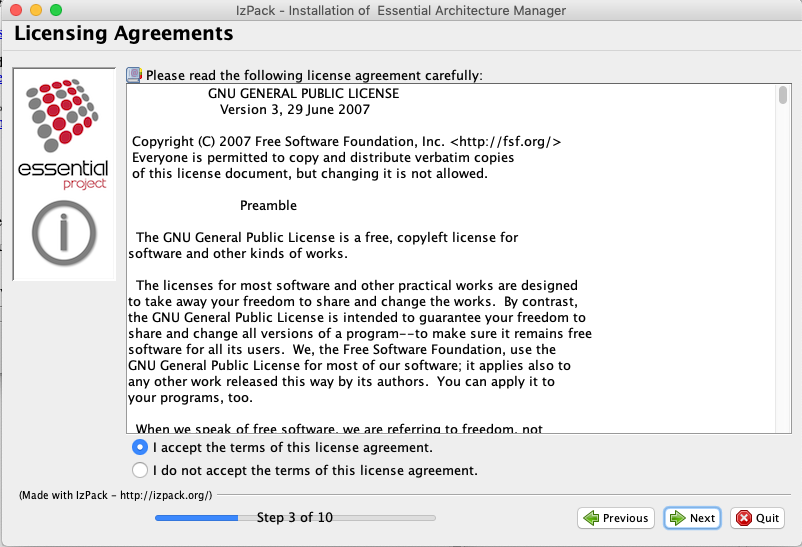
3. Select Essential Open Source Packages to Install
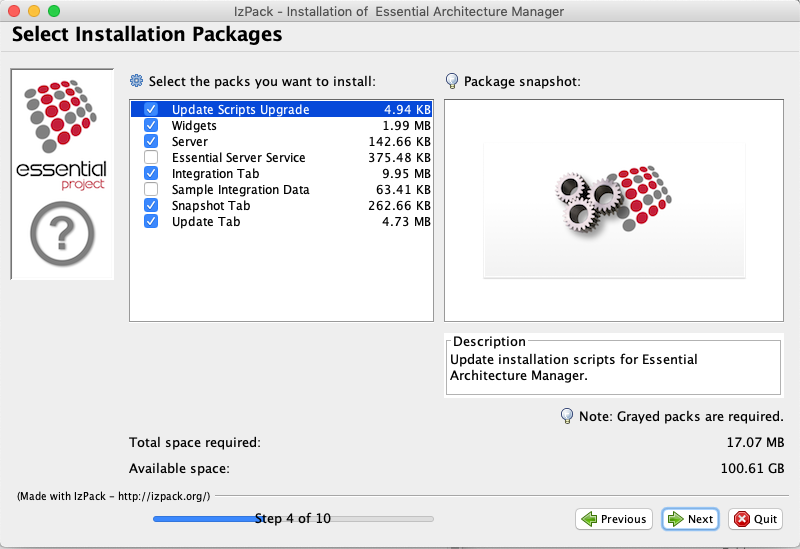
The Essential Open Source installer is divided into packages, enabling the installer to be used for installation possibilities.
For standalone installations, the ‘Server’ pack is optional but you can select all the install packages.
4. Specify Protege and Tomcat Locations
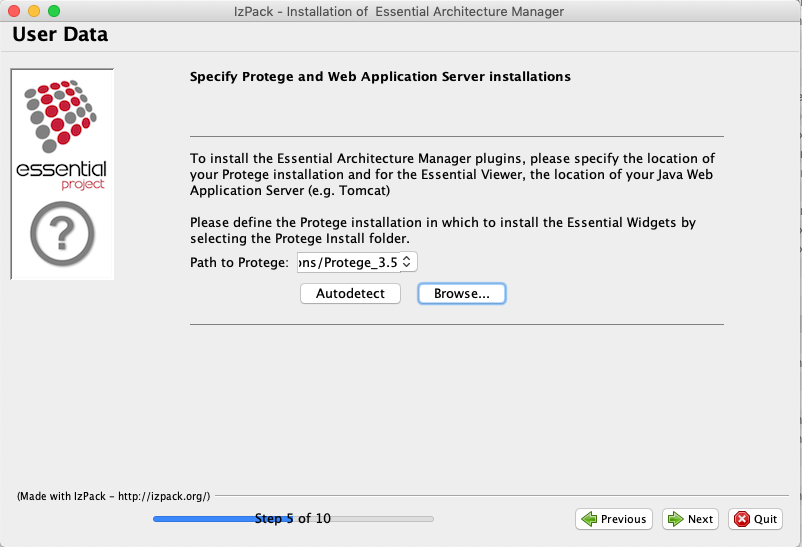
Essential Open Source includes plugins that must be installed into your Protege and Apache Tomcat (or alternative Java Web Application Server) installations.
The installer will ask you to specify the location of both your Protege and Apache Tomcat (or alternative Java Web Application Server). An attempt to automatically find Protege and Apache Tomcat in typical installation locations will be made. If the installer cannot find your Protege and Apache Tomcat installations, please use the ‘Browse…’ button to specify the folders in which they are installed.
If you have multiple versions of Protege installed, use the drop-down box or the ‘Browse…’ button to select which version of Protege that the Essential Widgets should be installed into.
When you select an location for either Protege, the installer will verify that location to ensure that you have selected a valid folder. Select the correct deployment location for Essential Viewer in your Web Application Server installation. For Apache Tomcat, select /webapps. For other Java Web Application Servers, please refer to your supplier’s documentation for Web Application deployment to find the correct location for deploying the Essential Viewer WAR file.
5. Essential Open Source Server Configuration (Optional)
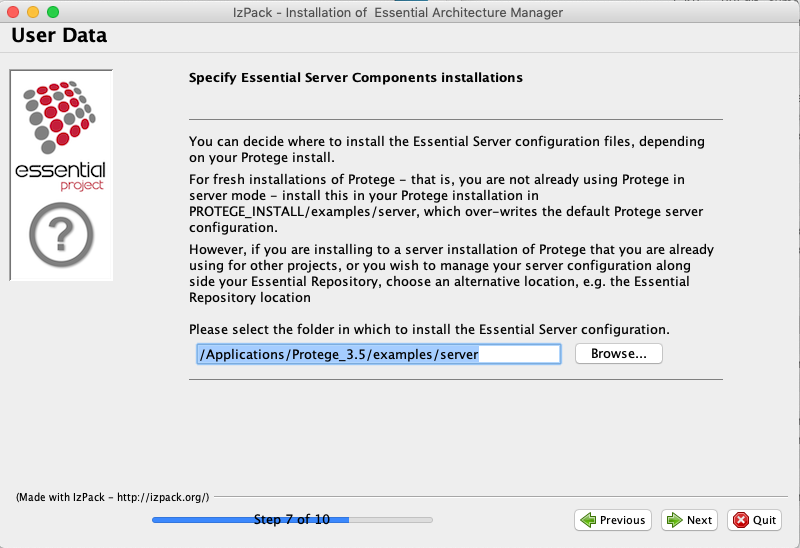
Even though this is a stand-alone installation, to aid future migrations to a server-based multi-user installation, you can choose to install the Server components of the installation.
If you are installing to a fresh installation of Protege, select the default option to install the server configuration directly into the Protege environment.
However, if you are installing Essential Open Source to a machine that already has Protege installed and running as a server in a multi-user environment, you should select an alternative location at this step of the installation, e.g. your Essential Repository location, to avoid the existing server configuration being over-written.
6. Finished
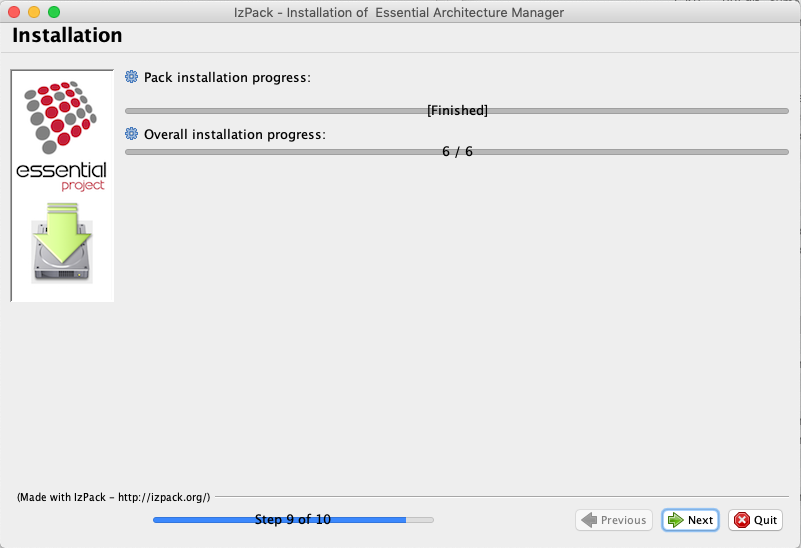
The installer will now install all the components of Essential Open Source to the locations that you have specified in the above steps.
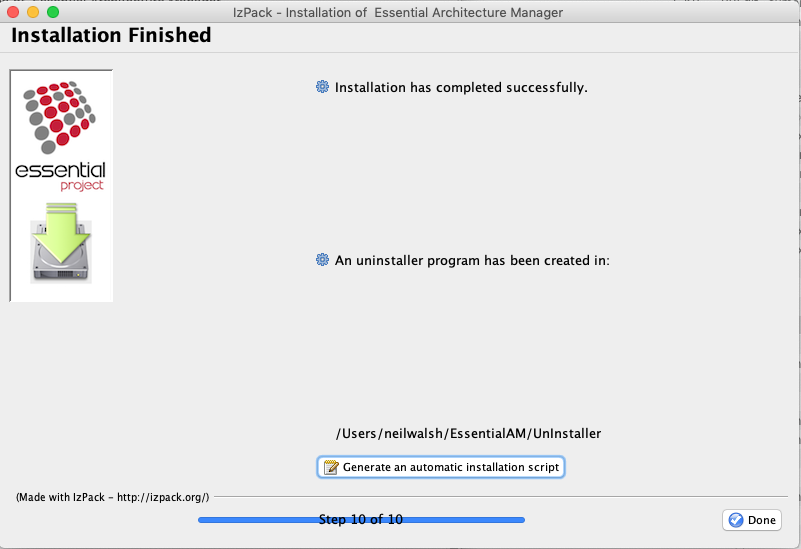
When the installation has completed successfully, you can create an automated installer to repeat this installation configuration, e.g. to install another verbatim copy on another machine. Select the ‘Generate an automated installation script’ option and specify the name and location of your automated install script.
Essential Meta-Model
Both the meta-model and the model for Essential Open Source are contained in the repository which is controlled from a Protege project file, and has the file extension, .pprj
Download and save this to a user accessible area on your machine such as your Documents folder. Unzip and then open the resulting PPRJ file using Protege.
All changes to the model are stored in this file and we recommend you take regular backups of the file in the event you wish to revert the repository to an earilier state.
Essential Viewer
Essential Viewer is a Java Web Application for publishing, analysing and reporting against enterprise architecture models captured using the Essential Meta-Model.
- Download and save the latest Essential Viewer WAR file.
- Rename the file to “essential_viewer”.
- Copy the renamed file to the “webapps” folder of your Tomcat installation folder.
Essential Import Utility
Essential Import Utility is a Java Web Application for importing existing content from spreadsheets into the Essential repository.
- Download and save the latest Essential Import Utility WAR file.
- Rename the file to “essential_import_utility”.
- Copy the renamed file to the “webapps” folder of your Tomcat installation folder.
Configure Memory Settings
Please check the memory settings are correctly configured for your set-up, see memory settings
Start Tomcat
If it is not already running, please start Tomcat using the appropriate method for your operating system
Configure the Protege Server
1. Setup Protege and Essential Environments
The Protege server is itself controlled by a Protege project called the ‘metaproject’. This project tells the Protege server about all the projects that it is be hosting, which users are defined and which projects the users can access. Once all the server software components have been defined, the following steps should be run on the physical server in order to define the metaproject.
The installation of the ‘Server’ pack, above, has deployed this configuration to your chosen location. By default, the installer over-writes the Protege example configuration to make the configuration of the Protege Server simpler. However, if you have installed the ‘Server’ pack to an alternative location, you wish to change the default location of this metaproject so that it can be managed alongside your Essential Open Source repository or you just wish to move it to a completely different area of your filesystem, you will need to do the following:
- Copy the metaproject.pprj, metaproject.pins and metaproject.pont files from [PROTEGE INSTALL]/examples/server/ to the new location, e.g. the /EssentialAM/Repository directory if moving it to be alongside your repository (Assuming that your repository is installed in /EssentialAM/Repository).
- Update the run_protege_server.bat (on Windows) or run_protege_server.sh (on Mac OS X, Linux, Unix etc.) file and change the METAPROJECT variable so that it refers to the file you created in above.
2. Meta Project Definition
This section requires you to start working with the Protege software. This guide will take you step-by-step through the process but you may wish to read the Getting Started tutorials to help familiarise yourself with Protege before proceeding.
The Protege server uses an ontology of projects to manage the repositories that it is hosting and serving. This ontology also defines the users and access control policies for the repositories. This must be configured as follows.
- Start the Protege GUI application.
- When prompted to open a project, open the metaproject that you wish to use:
- the default location for the metaproject is: [PROTEGE INSTALL]/examples/server/metaproject.pprj
- or your alternative location, e.g. /EssentialAM/Repository
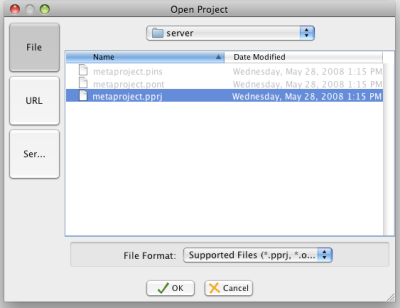
Open the metaproject
Once the metaproject has loaded, click on the ‘Instances’ Tab to create new instances that define the server configuration.
The ‘Server’ pack includes a pre-configured metaproject that only requires the path to your repository project to be specified. You may wish to add additional users to the configuration.
Complete the project for the Essential repository.
- Find the Project called ‘Essential AM Repository’. Projects are managed under the PolicyControlledObject class – open this class in the Class Browser to find the Project instances.
- Specify a user as the owner of this – typically this is the user who is also the administrator of the repository. You may wish to change the example configuration.
- Specify the location of the Protege project file that is the root of the repository. This is the full path to the Repository pack that was deployed by the installer and will be a .pprj file. Even if your repository is being stored in a database, a .pprj file is required. As this is a Java environment, use the Unix-style directory separators to define the location of the repository’s project file, e.g. on Windows, this would still be:
C:/EssentialAM/Repository/myRepository.pprj
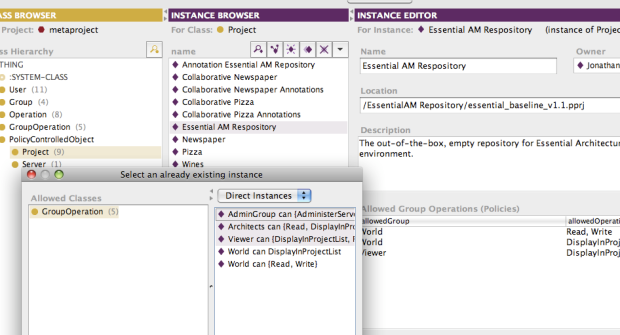
Define the project for the Essential repository
Having defined the Essential Open Source repository project to the Protege Meta Project, we need to add the Annotations Project for Essential Open Source to the Meta Project. The Annotations Project manages collaboration capabilities including tracking all changes to the repository and is created automatically by Protege when you choose to show the collaboration panel. If you have not already enabled the Collaboration in your Essential Open Source repository project, see the Enabling Collaboration article for how to do this.
Using the Annotations Project is optional but recommended for multi-user installations. You can create the Annotations Project after you have completed this Meta Project configuration. Protege Server will raise warnings if it cannot find the specified Annotations Project but you can continue to work with your repository in multi-user mode when Protege cannot find the annotations project.
Find the Project instance for the ‘Essential AM Annotations’ Project. This project contains the list of all the changes and collaborative activity that is taking place on the repository. Follow the same steps as those for the Essential Open Source repository project, above, to find the definition of the annotations project and remembering to specify a location of the annotations project file.
- The location of this annotations project should be in the same directory as the repository project, and will normally be named using a prefix of ‘annotation’ on the repository project name, e.g.
C:/EssentialAM/Repository/annotation_essential_am_repository.pprj
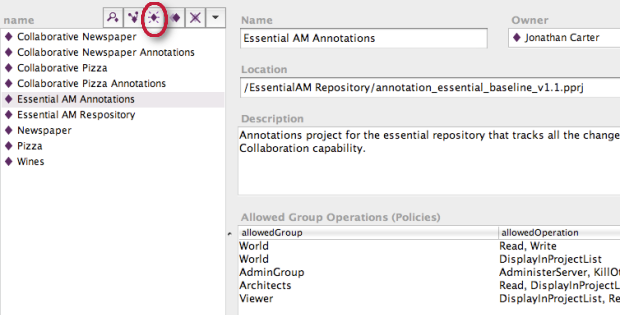
Define the Annotations project to track changes in the Essential repository
- Go back to the Project instance for the repository project, e.g. ‘Essential AM Repository’.
- In the field called AnnotationProject at the bottom of the form, select the Annotations project that you defined above, e.g. ‘My EA Repository Annotations’.
- You can delete the example users.
- Save the metaproject, using the Save button on the Protege client.
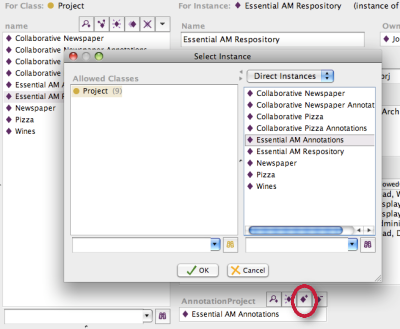
Setting the Annotations Project for the Essential Repository project
Repository Database Configuration
It is recommended that in Multi User mode, the Essential Repository is stored in a relational database. From within Protege, this means converting your repository project to be of the type “Protege database”.
To configure your database server, we recommend that you use the graphical administration tools for your database server, e.g. for MySQL GUI Tools. Alternatively, when using a managed database service, ask your DBAs to create the user accounts and empty database for Protege.
On your database server, create a user account for the Protege server that has rights to create schemata and tables. Then create an empty database for the repository named, e.g, ‘essentialdb’. You are now ready to convert your repository to use the database, so ensure that you have the following details:
- User name – e.g. essential
- Password – e.g. e55ential
- Database name – e.g. essentialdb
- JDBC Driver class name – e.g. for MySQL, this is com.mysql.jdbc.Driver
- JDBC URL, e.g. if the database server is a MySQL database installed on the same server as the Protege server: jdbc:mysql://localhost/essentialdb.
- Table – the name of your repository. Give this a meaningful name that describes you architecture repository, e.g. ‘myEARepository’.
NOTE: if you are using MySQL 5.6 and above, please read this forum posting and make the specified configuration update before proceeding.
The following database set up should be followed when migrating an existing stand alone repository project to a multi user repository.
To use the database to host the repository:
- Stop the Protege server if it is running
- Back up the existing file-based repository (PINS, PONT and PPRJ files) if you have already been working with the repository using the standard project files.
- Open the file-based Protege Project that you wish to have hosted in the database.
- Select File->Convert Project to Format
- Select Protege Database from the list of options and complete the dialog form using the database details listed above.
Protege will then create the a table in the database you specified with the name you supplied for the repository and write the entire repository into that table.
IMPORTANT. Do not edit the database contents directly, e.g. via database management tools. Always use the Protege software to update the repository.
Starting the Protege Server
Once the metaproject has been defined, the server is ready to be used. Starting the server is simply a case of running the run_protege_server.bat or run_protege_server.sh file that is found in the directory. You can create a shortcut to this batch or script file on your desktop. This batch file starts 2 child processes:
- The Java RMI Registry to broker client connection requests.
- The Protege Server
Running the Server as a Windows Service
It is important that the Essential repository server is always running and able to serve requests from its clients, so it should be configured to run as a Service on Windows server platforms. Currently, the Protege software does not include the capability to run as a native Windows service, so we provide a toolkit based on the Apache Commons Daemon. Full instructions for how to download, install and use the Essential Server Service are available in the Adminstration Documentation.
1. Running automatically on Unix-based platforms
When Essential Open Source is deployed on Mac OS X, Unix and Linux platforms, the run_protege_server.sh script file should be included in the start-up scripts / schedules so that it is restarted when the physical server platform is re-started.
Starting and Stopping the Protege Server
1. Starting the server manually
To start the server from a login at the server’s desktop, navigate to the directory and then:
- On Windows: run run_protege_server.bat, e.g. via a shortcut on the desktop.
- Mac OS X, Linux or Unix: from a terminal window, run run_protege_server.sh
2. Starting the server automatically
Preferably, start the Essential Server via a Windows Service (see Section 11) or configured in the Unix/Linux start up scripts (see Section 12). If the server platform has already started and the Essential Server is not running, start the Windows Service via the Services control panel or run the run_protege_server.sh script as a background job.
./run_protege_server.sh &
3. Stopping the Protege Server
1. Stopping the Protege Server – Windows
If you are running the Protege Server as a service, use the Essential Server Service Manager application (EssentialAMServerw.exe) and press the Stop button to stop the service.
To stop the Essential Server that was started manually:
- Go to the Protege installation directory
- Run the shutdown_protege_server.bat file. A hostname can be passed to this batch file to terminate a remote server. Use with care.
To completely stop all components of the Essential Server the Java RMIRegistry must also be stopped. Ensure that the Protege Server has been stopped before stopping the RMIRegistry.
A desktop shortcut can be defined to the shutdown_protege_server.bat file to make it clearer how to stop the repository server. Give that shortcut an icon like the red box with the white “off” symbol on it.
To stop the RMI Registry:
- Open the Windows Task Manager:
- Find the process called “rmiregistry”. Terminate this process.
A restart of the Protege Server without first stopping the RMIRegistry will not cause any problems, as the RMIRegistry will only start if an existing RMIRegistry is not already running (it implements a Singleton pattern).
2. Stopping the Essential Server – Mac OS X, Unix and Linux
To stop the Essential Server:
- Go to the directory
- Run the shutdown_protege_server.sh file. A hostname can be passed to this batch file to terminate a remote server. Use with care.
To completely stop all components of the Essential Server the Java RMIRegistry must also be stopped. Ensure that the Essential Server has been stopped before stopping the RMIRegistry.
At a terminal command line, type:
ps -ef grep rmiregistry
Find the process ID of ‘rmiregistry’ by using the following command at a terminal prompt:
kill -9 [processid]
where is the process ID of the rmiregistry process.
A restart of the Protege Server without first stopping the RMIRegistry will not cause any problems, as the RMIRegistry will only start if an existing RMIRegistry is not already running (it implements a Singleton pattern).
Server Installation Complete
Your server installation of Essential Open Source is now complete. Now complete the Client Installation on each of the workstations that you need to provide access to update the architecture model.
Client Installation
Overview
Installing Essential Open Source on the clients that will be creating and maintaining the architecture only requires only 3 simple steps of the installation process to be performed on each client workstation or notebook. This consists of:
- Ensuring that a Java Runtime Environment is installed on the client workstation.
- Installing Protege
- Installing the Essential Widgets.
Installation Complete
Your multi-user installation of Essential Open Source is now complete. Now go to the Getting Started Tutorials to find out more about capturing and analysing your architecture with Essential Open Source.
The Essential Baseline repository is an empty project in which you can start capturing details of your architecture. Download and explore the latest Sample Repository for an example of how to use Essential Open Source.
Troubleshooting
- On Windows 8 or Windows 10 platforms, if the installer fails to install the Essential Open Source plugins to the Protege install folder in Program Files, right-click on the installer program and use the ‘run as administrator’ facility.
- On newer Mac operating systems you may need to disable Gatekeeper for the install. See this article. Make sure you re-enable Gatekeeper after you have installed the software
- After installation, if Essential Viewer is not responding or the Report Service is not responding, check that the essential_viewer.war has been extracted and deployed to your web application server (e.g. Apache Tomcat) webapps folder. If the WAR file does not extract when you restart Apache Tomcat, you can deploy the WAR using the Tomcat Manager.
Updated 7 March 2024
